Rin.Rename is a powerful, command-based renaming tool with a clean, minimal interface. Built for efficiency, it supports batch renaming, selection order control, hidden objects, an intuitive numbering system, and name exporting to spreadsheets—along with many other handy features. Instantly preview your changes in real time, right in the viewport.
- Follows Selection Order: Rename objects while preserving the order in which they are selected.
- Works with Hidden Objects: Renames hidden scene objects.
- Command-Based Minimal Interface
- Real-Time Preview: Shows renaming results in the viewport as you type.
- Common Renaming Tools: Search & replace, numbering, prefixes/suffixes.
- Various Text Transformations: Uppercase, Lowercase, Titlecase, Camelcase, etc
- Token Support: Use
$for object name,;;for collection name,~nfor word,#nfor number, and more… - Collection Batch Rename
- Export names to Spreadsheet (.CSV) Edit names with external editors
- Number objects using sequences from A-Z
- Name Swapping: Swap the names of two objects.
- Copy object name to data
- Copy names from active object
- Name Mirroring: Copies names from the first half of the selection to the second half
- Comma Rename: Rename multiple objects simultaneously by separating names with a comma (,).
- Separator Replacement: Replace separators in names.
- Insert Text at Specific Positions: Add text at a specified position in object names.
- Remove N-number of characters: from the start or the end of names
- Rename Bones & Shape Keys
- Group Comma: Rename similar group of names
Preferences:
- Customizable HUD
Extras (not related to renaming):
- Selection Mode with Regex Support: Select objects based on regular expression patterns.
If Rin.Rename isn’t detecting your selection or the selection order seems off, you may have spotted a bug. If you can reproduce the issue, please report it through the supported channels (links right below).
As a temporary fix, try deselecting everything, reselecting the objects, and running the tool again.
Since this tool is newly released, some bugs may surface, and your feedback is appreciated to help improve it. If you run into any issues, please feel free to reach out for support using one of the following methods:
When you activate the tool, a dialog box will appear with a text field initially populated with the name of the first item in your selection.
If you pressed Enter, the selected objects will be renamed to
If there are no numbers in the text input, RIn.Rename will automatically append numbers to the names, ensuring each object in Blender’s scene remains unique.
The default numbering format is .001, which is zero-padded to three digits. Numbering starts at 1, with . as the separator.
You can configure the default numbering format (the separator character and the number of digits) in the Addon Preferences.
Default numbering is applied when renamed results for multiple objects aren’t unique:
Example 1: (no numbering in the text input):
You can override the numbering format by adding numbers in your text input:
Example 2:
Example 3:
You can start at a specific number:
You can use ’ @ ’ to number with alphabets (A-Z).
Note: Any numbers in the input text will automatically increment for each subsequent item. If you want to keep a number static and avoid incrementing, enclose it in angle brackets ().
For example, without angle brackets:
With angle brackets:
When you select or deselect objects in the viewport, this tool keeps track of the selection order. This ensures that when you apply numbering, the numbers follow the exact order in which the objects were selected.
You can rename multiple objects at the same time using comma.
Note: Whitespaces surrounding text are trimmed / stripped
If you type just a comma ’,’ and press Enter, the text field will automatically populate with the names of the selected objects.
From here, you can modify the names as needed. For example:
Use the token ’/’ to replace text.
Leave the part after ’/’ blank.
The will remove any occurance of text_to_remove in the names
Think of tokens as variables for renaming—they can represent parts of the object’s name or the entire name without requiring you to type them manually. They can also reference the object’s collection name or expand into letters A–Z.
You can mix and match them to create different naming variations.
For example:
$_~1~1 #2 @
$* (Object's Full name)
;; (Object's collection name)
~n (The n-th word in the name)
~~n (The n-th word in the name + trailing separators)
~~-n (The n-th word in the name + *leading* separators)
#n (The n-th number in the name)
##n (The n-th word in the name + trailing separators)
##-n (The n-th word in the name + *leading* separators)
@ (Letter A-Z)
You can enclose tokens in angle brackets < > to neutralize their special meaning, allowing them to be treated as regular characters in the name.
That said, it’s best to avoid using token characters in names whenever possible. If you run into any issues, don’t hesitate to report them.
By using $*, you can add prefix and suffix to the name like so
Note: n == integer number
~1 refers to the first word of the object's name.~~1 refers to the first word of the object's name + its trailing separators
~~-1 refers to the last word of the object's name + its leading separators
The double tilde (~~) removes the word along with its trailing separator.
Using a negatif number lets you select words from the end of the name and targets the leading separator instead of the trailing one.
Note: n == integer number
#1 refers to the first number of the object's name.##1 refers to the first number of the object's name + its trailing separators
##-1 refers to the *last* number of the object's name + its *leading* separators
The double pound (##) removes the number along with its trailing separator.
Using a negatif number lets you select numbers from the end of the name and targets the leading separator instead of the trailing one.
When tokens aren’t enough for complex naming tasks, you can use regular expressions (regex) to target specific patterns in object names.
- Wrap your regex pattern in curly brackets
{ }. - Text inside the brackets is treated as a regular expression.
- Use parentheses
( )to capture specific parts of the name.
If the regular expression doesn’t find a match, instead of returning an empty string (""), you can specify a fallback value using the /or:replacement_text/ syntax. Place this at the end of the expression.Tip: Regular expressions offer great flexibility but require some familiarity with regex syntax.
Need help crafting patterns? Try tools like regex101.com for testing and quick explanations.
For example:
Commands are short text instructions you type to tell RinRename what to do.
For now, most commands can’t be combined with tokens—while you can use it with >>, <<, comma rename and search and replace, the tokens won’t function as intended. Future updates will gradually bring this compatibility.
<<suffix_text (Add Suffix)
old_text/new_text (Search and Replace)
seperator (Replace separator)
use_with_other_textpreserve textuse_with_other_text (Preserve text)
-n (Remove n characters from the start)
--n (Remove n characters from the end)
+text@position (Insert text at position)
Regular Expressions with (capture group) (Regular Expression with capture group)
, and press Enter key (Names Fill)
name1,name2,... (Comma rename)
(name1,name2,...) (Group Comma rename)
>>extra_text(prefix1,prefix2,...)extra_text (Add a list of prefixes)
<<extra_text(suffix1,suffix2,...)extra_text (Add a list of suffixes)
/x (Swap two names)
/d (Copy object name to data)
= (Copy name from last selected)
== (Name mirroring)
/. (Preferences)
/? (Show a list of commands and tokens for reference)
/?ref (Opens "RInRename_reference.pdf" that comes with the addon)
/?doc (Opens online documentation)
Case conversions:
/lo, /low, /lower (Covert to lowercase)/up, /upper (Covert to Uppercase)
/camel (Covert to Camel case)
/title (Covert to Title case)
/cap, /capitalize (Covert First word to Title case)
/sc, /sc:sep (Split Camel case)
Remove/trim whitespaces:
/strip (Removes leading and trailing whitespaces)/lstrip, /ls (Removes leading whitespaces)
/rstrip, /rs (Removes trailing whitespaces)
Remove/trim special characters:
/stripSep, /ss (Removes leading and trailing Non-alphanumeric characters)/lss (Removes leading Non-alphanumeric characters)
/rss (Removes trailing Non-alphanumeric characters)
Syntax: >>text_to_prefix
Syntax: text_to_suffix
Numbers won’t increment automatically:
If you want auto-incrementing numbers, use the $ or $* token:
You can remove a certain number of characters from the start or end of a name using -n or --n, where n is a number.
- -n removes characters from the left of the name.
- Example: -1 removes the first character, -2 removes the first two, and so on. - --n removes characters from the right of the name.
- Example: --1 removes the last character, --2 removes the last two, and so on.
Insert text at a specific position in the name using the syntax: +text@position.
- Example:
+hello@3inserts"hello"after the 3rd character in the name.
Select two objects and use ’/x’ to swap their names.
Replace any character that is not a letter (A-Z) or numbers (0-9) with the text within the angle brackets.
Under the hood, the code uses the regex pattern [^A-Za-z0-9]+ to find any characters that are not letters or numbers.
Example 1:
Example 2:
Example 3: *There’s a space between the angle brackets
Example 4: *Any text can be used, not just . , _ - or space
The active object in Blender is the last item selected in Object Mode. It’s outlined in yellow.
Select multiple objects, making sure to select the source or active object last. Type = (and then press Enter/Ok) to copy from the source name.
Example: Numbering will be added to Target names while Source’s name is not changed.
Use ’==’ to copy names from first half of the selection to the second half.
Selections is divided by 2 to get the first half and second half, names are then copied from first half to second half
The group comma command allows you to assign different names to objects based on their collections using a specific syntax:
prefix_text_ ( text_one , text_two , ... ) _suffix_textThe parentheses and commas inside them are required.
This command is particularly useful when renaming objects that exist in multiple collections. The grouped names inside the parentheses will be applied to objects within each collection in order.
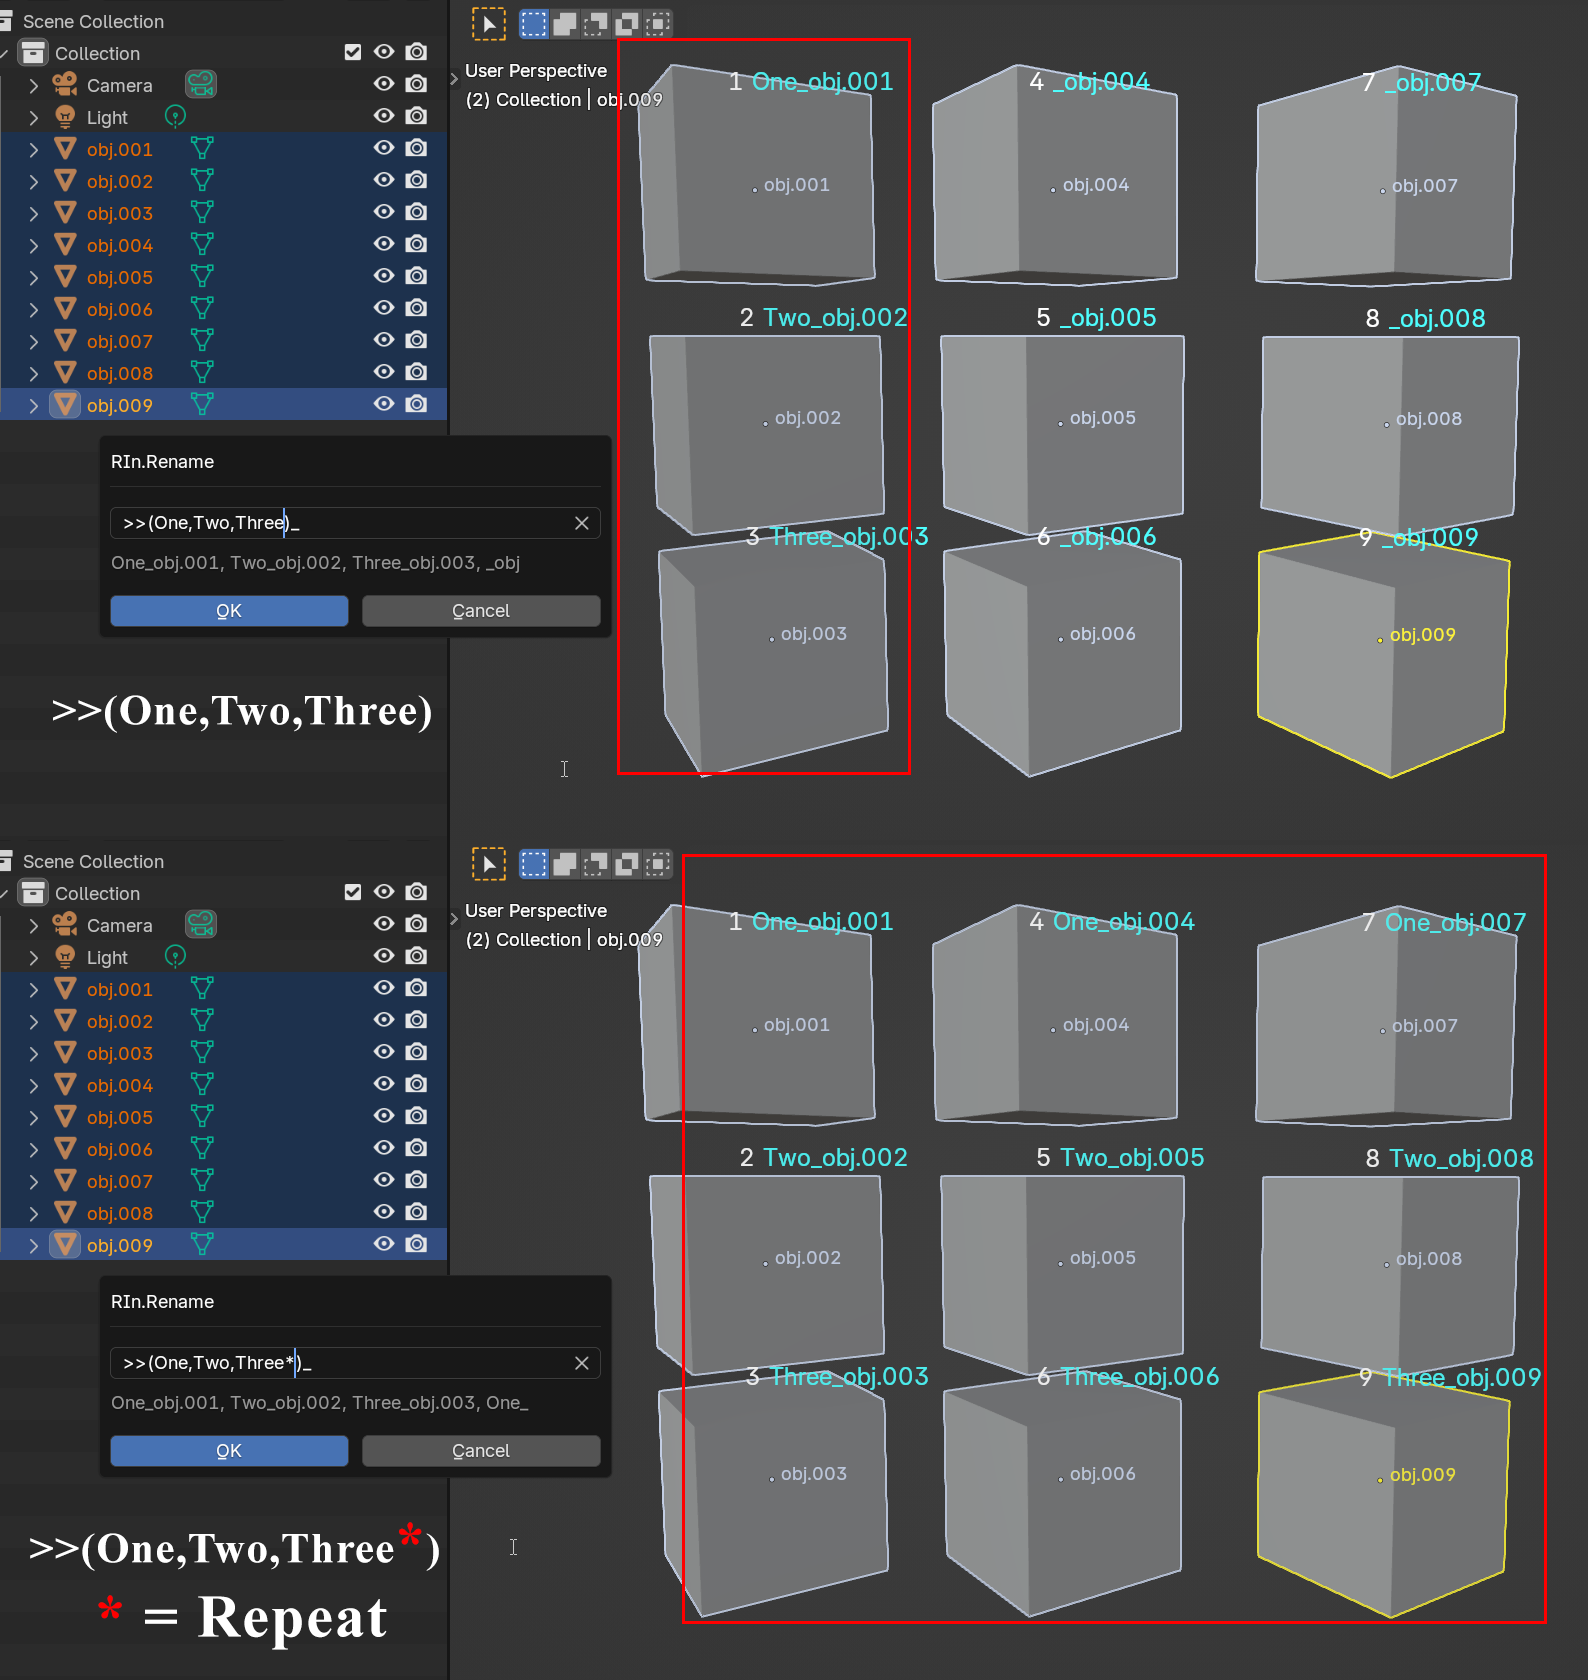
For example, if you use (text_one, text_two, text_three), the first collection’s objects will be named text_one, text_two, text_three, and the same pattern will repeat for objects in the second collection, then the third, and so on.
This is especially handy for naming objects across collections with similar structures. For instance, if you have Highpoly, Lowpoly, and Cage collections, you can use this command to ensure objects in each collection share consistent naming while keeping their group distinctions.
Syntax: ( name1, name2, … )
- Enter a name group in parentheses, like
(aaa, bbb). - Rinrename applies the names in order to objects in each collection.
- If the collection has more objects than the group, it repeats the sequence until all objects are named.
Selections
Collection A: Object1, Object2, Object3
Collection B: Object4, Object5
Collection C: Object7, Object8, Object9, Object10 Simplified Output
Collection A: aaa, bbb, aaa
Collection B: aaa, bbb
Collection C: aaa, bbb, aaa, bbb
Note: in actual Blender scene, since names has to be unique, it will turn into the following
Actual Output
Collection A: aaa.001, bbb.001, aaa.002
Collection B: aaa.003, bbb.002
Collection C: aaa.004, bbb.003, aaa.005, bbb.004
which might be confusing, so you might want to pair it with the collection token ;;:
Actual Output
Collection A: [Collection A] aaa.001, [Collection A] bbb, [Collection A] aaa.002
Collection B: [Collection B] aaa, [Collection B] bbb
Collection C: [Collection C] aaa.001, [Collection C] bbb.001, [Collection C] aaa.002, [Collection C] bbb.002
This command is useful for the following situation:
Selections
HI: Object1, Object2, Object3
LO: Object4, Object5, Object6
CAGE: Object7, Object8, Object9Output
HI: cube_HI, sphere_HI, pyramid_HI
LO: cube_LO, sphere_LO, pyramid_LO
CAGE: cube_CAGE, sphere_CAGE, pyramid_CAGEYou can use the prefix and suffix command with group comma:
If you add an asterisk at the last item before the closing bracket, the items in the group will repeat for all the objects:
Use /d to copy an object’s name to its data name.
Note: Blender doesn’t keep object and data names in sync when using the standard F2 rename or the Batch Rename tool (Ctrl + F2).
RIn.Rename have the option to automatically rename mesh data names.
The /strip command removes extra whitespace from both the beginning and end of an object’s name.
- /lstrip ( short form: /ls ) – Removes whitespace from the left side.
- /rstrip ( short form: /rs ) – Removes whitespace from the right side.
The /stripSep command (where sep stands for separator) goes beyond just trimming whitespace—it removes any non-alphanumeric characters (anything not in A–Z, a–z, or 0–9). This includes common separators like -, _, ., and spaces. (In code, it targets [^A-Za-z0-9])
Short forms:
- /ss – Strip from both sides
- /lss – Strip from the left side
- /rss – Strip from the right side
💡 Note: While the name
/stripSepsuggests it only targets separators, it’s broader and removes any non-alphanumeric characters.
The /camel command converts the core of the name (based on the $ token) into camel case.
How it works:
- It extracts the core name using the
$token. - It joins words if the last character of one word and the first character of the next are letters (e.g.,
"Character_Armature"→"CharacterArmature"). - Words separated by non-letter characters (like
"Cube.01"or"v2_4k") won’t be joined.
Selections
01. Cube.01-Main.001
01_Character_Armature_Final.001
Light Rig_v2_4K
Output
01. Cube.01-Main.001 (No Change)
01_CharacterArmatureFinal.001
LightRigV2_4KThe /sc command splits camel case text using a separator.
You can specify the separator like this:
- /sc:sep
- /scsep
If no separator is provided, it defaults to the one set in the preferences (Preferences > Naming > Separator).
These text transformation commands support tokens: /up, /lo, /title
Example:
/up ~2 will transform second word of the object’s name into uppercase. /up ~1~2 will transform the first and second word of the object’s name into uppercase.
(Inspired by Spreadsheet Batch Renamer by Bookyakuno)
You can use the following export commands to export names to a temporary .CSV file (saved in the temporary folder. %localappdata%\Temp in Windows) or directly to the clipboard (which you can then paste into notepad or other text editor), allowing you to edit them in an external editor.
After you run the export command, RIn.Rename will open the exported .csv file with the default application (eg. Microsoft Excel). You can set it to use other application like Notepad, Visual Studio Code, Rons CSV Editor or any software that support text or csv editing.
Once edited, the import commands lets you apply the updated names from either the .CSV file or the clipboard.
Export Commands:
/e, /ea (Export All object names to CSV file)/es (Export Selected object names to CSV file)
/eac (Export All object names to *Clipboard*)
/ec, /esc (Export Selected object names to *Clipboard*)
Import Commands:
/i (Import names from CSV file)/ic (Import names from *Clipboard*)
In the Preferences, you can set which application to open the .csv file with. If you leave it blank, it will open the exported .csv file with the default application set by the operating system.
Comma-separated values (CSV) is a text file format that uses commas to separate values, and newlines to separate records.
A CSV file stores tabular data (numbers and text) in plain text, where each line of the file typically represents one data record.
Each record consists of the same number of fields, and these are separated by commas in the CSV file.
Example:
exported using \eac (* Export All object names to clipboard.)
[------------------------------Scene Collection------------------------------]
[------------------------------Axe------------------------------]
[------------------------------CAGE------------------------------]
cube_CAGE,cube_CAGE
pyramid_CAGE,pyramid_CAGE
sphere_CAGE,sphere_CAGE
[------------------------------Collection------------------------------]
Light,Light
Camera,Camera
[------------------------------HI------------------------------]
cube_HI,cube_HI
pyramid_HI,pyramid_HI
sphere_HI,sphere_HI
[------------------------------LO------------------------------]
cube_LO,cube_LO
sphere_LO,sphere_LO
pyramid_LO,pyramid_LO
Example:
exported using \ec (* Export Selected object names to Clipboard.)
cube_CAGE,cube_CAGE
pyramid_CAGE,pyramid_CAGE
cube_LO,cube_LO
cube_HI,cube_HIPlease do not change the names in the first column. The addon works by finding the object names listed there and renaming them to the corresponding names in the second column. If you edit the first column, the addon won’t be able to find the objects
To export bones and shape keys to spreadsheet, you need to have an armature or an object with shape keys selected.
Bones Import Export Commands:
/eb (Export Bone names to CSV file)/ebc (Export Bone names to *Clipboard*)
/ib (Import Bone names from CSV file)
/ibc (Import Bone names from *Clipboard*)
Shape Keys Import Export Commands:
/esk (Export Shape Keys names to CSV file)/eskc (Export Shape Keys names to *Clipboard*)
/isk (Import Shape Keys names from CSV file)
/iskc (Import Shape Keys names from *Clipboard*)
To rename shape keys, you must have exactly one object selected.
Then, type /sk: followed by the desired command.
- old_text/new_text (Search and Replace)
- $, $*, @
- Text transformations commands like /up, /lo, /title, etc
Example:
- /sk:old_text/new_text
- /sk:prefix_$_suffix
- All Text transformation commands like /sk:/up, /sk:/lo, /sk:/title, etc
Select Mode is activated when you run RinRename with no objects selected.
In this mode, you can select objects using regular expressions—any object whose name matches your pattern will be automatically selected.
Note: I’m still exploring the direction of Select Mode, and what to do when nothing is selected. This is still under consideration as I’m focusing on other renaming features. Got thoughts? I’d love to hear them!
Displays a quick reference list of available tokens and commands.
💡 Handy if you forget a token or want to see what’s available.
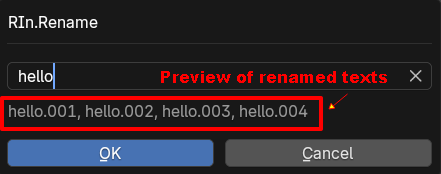
In Blender version 4.1 and earlier, there’s a known issue where the preview text (highlighted at the picture below) doesn’t update in real-time as you type.
To work around this, you can disable the preview text and instead rely on the Heads-Up Display (HUD) in the bottom-left corner of the 3D view.
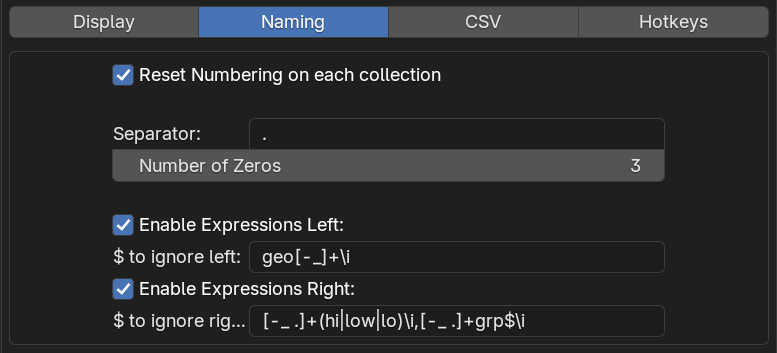
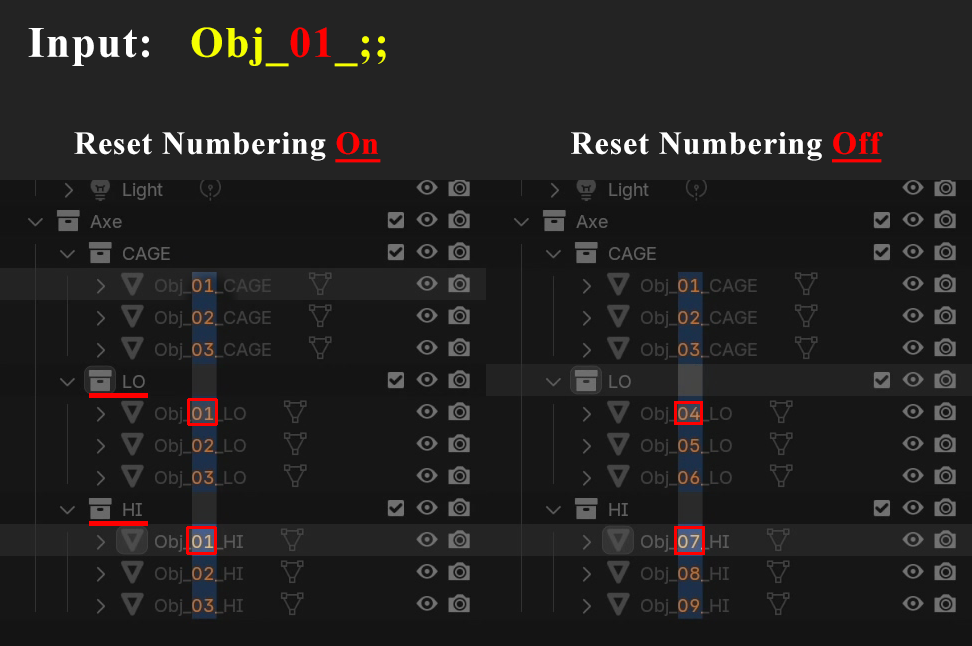
This setting allows you reset the numbering on each collection, it affects the numbering in your input (you need to have numbers in the text input eg: ‘name_01‘)
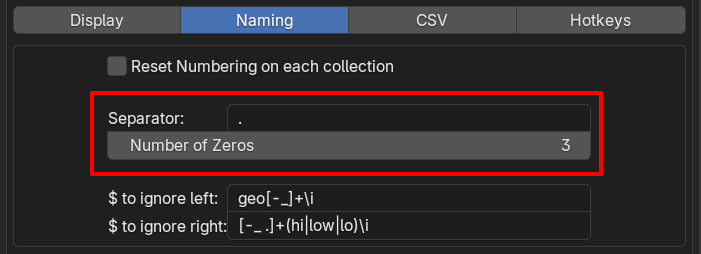
The Separator and Number of Zeros settings let you customize the numbering format. By default, it follows Blender’s format (.001), but you can change it to _01, -0001.
Note: “Number of Zeros” actually refers to the total number of digits. For example, setting it to 3 will format numbers as 001.
Example:
These two settings ($ to ignore left and $ to ignore right) let you customize how the $ token expands.
By default, $ removes any non-alphanumeric characters from the beginning and end of a name. However, these settings allow you to specify additional characters to remove, making it useful for automatically stripping common naming patterns like GEO_, _GRP, _HI, or _LO.
Both settings accept regular expressions, and you can define multiple patterns by separating them with commas.
To make an expression case-insensitive, add /i at the end.
Default Expressions in Rin.rename:
- $ to ignore left:
geo[-_]+\i - $ to ignore right:
[-_ .]+(hi|low|lo)\i,[-_ .]+grp$\i
The json files looks like this:
{
    "hotkey": [
        "F2",
        0,
        0,
        0
    ],
    "display_hud_above_object": 0,
    "display_hud_left_corner": 1,
    "display_object_viewport_name": 1,
    "display_preview_text": 1,
    "display_selection_order": 0,
    "HUD_font_color": [
        0.3,
        1,
        1,
        1
    ],
    "HUD_font_size": 20,
    "separator": ".",
    "num_of_zeros": 3,
    "reset_numbering_on_each_collection": 1,
    "dollar_token_to_ignore_left": "geo[-_]+\i",
    "dollar_token_to_ignore_right": "[-_ .]+(hi|low|lo)\i",
    "csv_application_path": ""
}
This feature allows you to back up and restore your preferences. If you reinstall the add-on, your settings will reset to the defaults (you will lose your user settings).
By using Load User Settings, you can easily recover your previously saved configurations from the JSON file.
If you encounter bugs or unexpected issues, please don’t hesitate to reach out. The more details you provide, the easier it will be for me to troubleshoot:
✅ Console error messages
✅ Screenshots (if necessary)
✅ Videos (if necessary)
I’ll do my best to respond promptly.
- Run Blender from the console (command line).
- Enable the “Enable Console Logging” option in the add-on preferences to display helpful debugging information.
🎉 Fun Fact: You can catch a behind-the-scenes look at how Rin.Rename keep track of the selection order by checking the console logs! 👀💻
Got feedback? Ideas for new features? Or just not happy with how something works? I’d love to hear from you!
📧 Email me directly
💬 Comment on my YouTube video
📝 Post on the Blender Artists thread 💻 Join the discussion on my Discord channel
Your input helps make RinRename better!
Just some ideas, not yet commited:
New command to convert numbering format[NOV2025]Search and replace feature ability to ignore case for the search text (eg. search/ will match Search or SearCH)[NOV2025]- Simple expression for in search and replace
- Type token? (Light, Geo, Lattice, grp, etc)
- Rename vertex groups
- Rename textures, materials
- Rename all instead of selected
- Rename everything in a collection without having to select the objects
- Improve +text@position to support negatif numbers, and get dynamic position using regular expressions
- Make @ more flexible: to be able to use lowercase, to be able to start from a specific Alphabets
- Invert word and number token !~1 (every word except the first one?)
- etc…
Nov 25th, 2025
- Fixed ’=’ command behaviour, auto-incrementing until unique name found
Nov 22nd, 2025
- New Feature: Chain Commands ( | )
- Added Single Selection Mode (updates immediately, no need to press
Enteror press theOKButton) - Improve Help Displays
- New Feature: Change Numbering Format
- New Feature: Per-Object Input Fields ( ,, )
- Export selected objects or all objects as Text file
- plus other smaller tweaks + fixes…
Mar 11st, 2025
- Fix some bugs
- Added more features and improvements
- Update Documentation
- Introduction Tutorial video at Youtube
- Publish to Blender Market, Gumroad, Artstation
Nov 13, 2024
- First beta release at Blender Artist thread
