3. Weapons Alignment (Rifle)
This page continues from the character-retargeting setup. At this point, the custom character can already follow ALS locomotion, but the rifle overlay still needs character-specific alignment.
The goal is to fix two separate problems:
- the rifle must attach to the visible character’s right hand
- the left hand must reach a valid grip point on the rifle
The final setup uses:
- a
Riflesocket on the character skeleton for right-hand weapon placement - a duplicated rifle mesh and rifle skeleton in project content
- a
LeftHandGripsocket on the duplicated rifle - an Animation Blueprint variable that reads the grip socket transform
- a Control Rig that moves the left arm toward that transform
- an alpha value that disables the IK when no valid rifle grip exists
The example paths in this guide use the Shenya setup:
| Asset | Path |
|---|---|
| Character Blueprint | /Content/ALS_Shenya/B_Als_Shenya |
| Animation Blueprint | /Content/Shenya2/Meshes/ABP_Shenya |
| Left-hand Control Rig | /Content/Shenya2/Meshes/CR_Shenya_LeftHandIK |
| Custom rifle skeleton | /Content/ALS_Shenya/Overlay_Objects/Rifle/SK_Als_Rifle_Shenya |
| Custom rifle mesh | /Content/ALS_Shenya/Overlay_Objects/Rifle/SKM_Als_Rifle_Shenya |
Right-Hand Weapon Placement
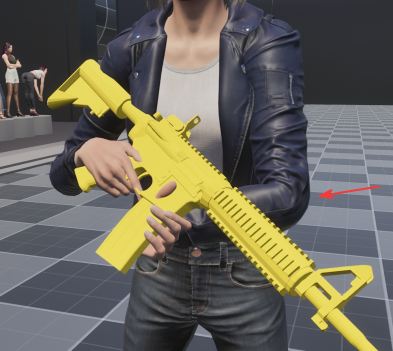
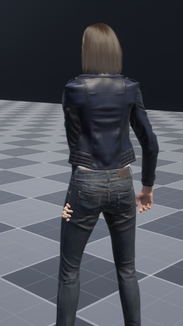
Section titled “Right-Hand Weapon Placement”The rifle is an ALS overlay object. In the default ALS setup, overlay objects are built around the ALS character mesh and ALS skeleton. After adding a custom character mesh, the rifle can still be attached to the hidden ALS driver mesh or to a socket that does not line up with the visible character.
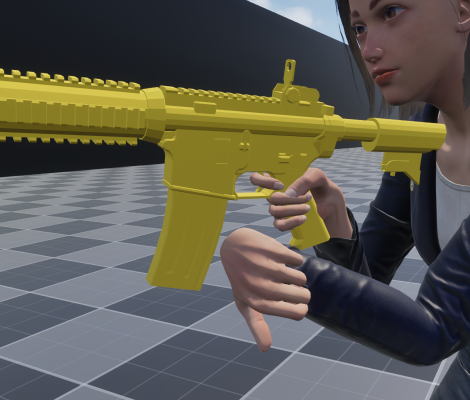
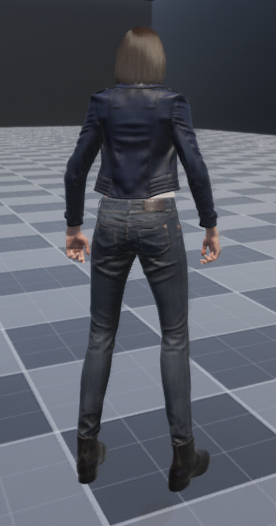
That creates this kind of result:
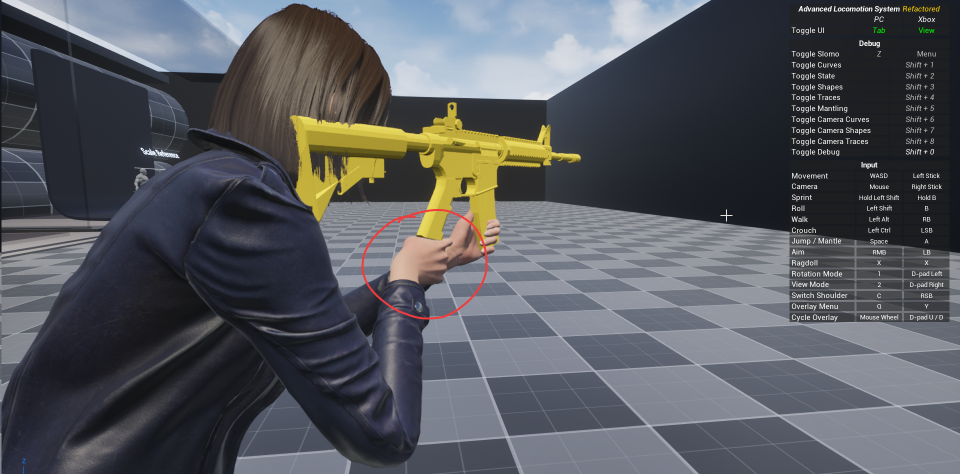
For a custom character, the safer setup is:
- keep ALS driving locomotion as before
- attach the rifle to a socket on the visible character skeleton
- use a separate grip socket on the rifle for left-hand IK
This avoids depending on the ALS weapon bone for the visible weapon placement.
1. Attach the Rifle to the Visible Character Mesh
Section titled “1. Attach the Rifle to the Visible Character Mesh”1. Create a Rifle Socket on the Character Skeleton
Section titled “1. Create a Rifle Socket on the Character Skeleton”Open your custom character skeleton, find the right-hand bone, then create a new socket named:
Rifle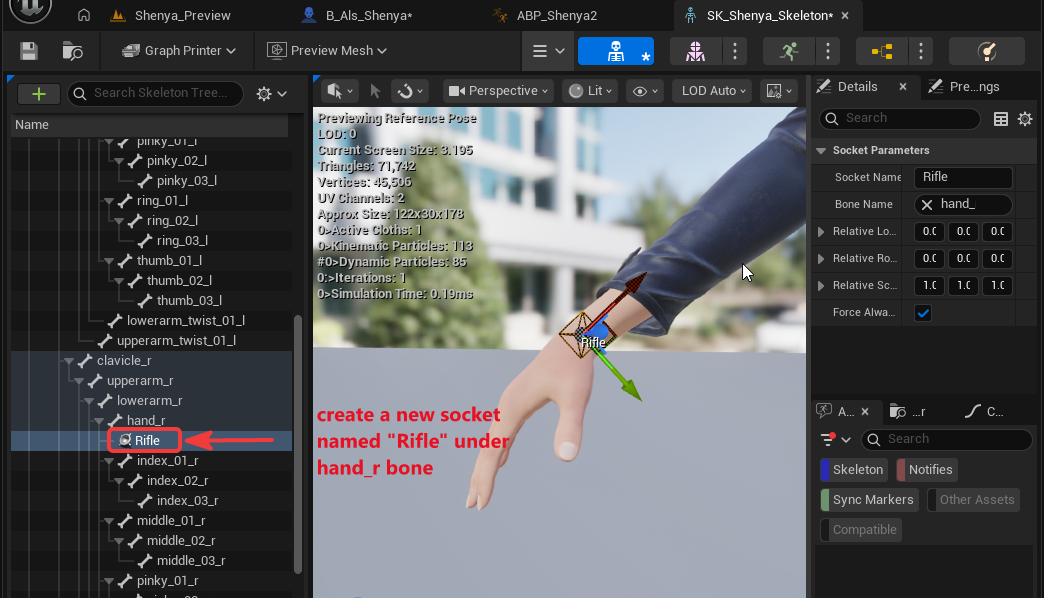
This socket becomes the attachment point for the rifle on the visible character.
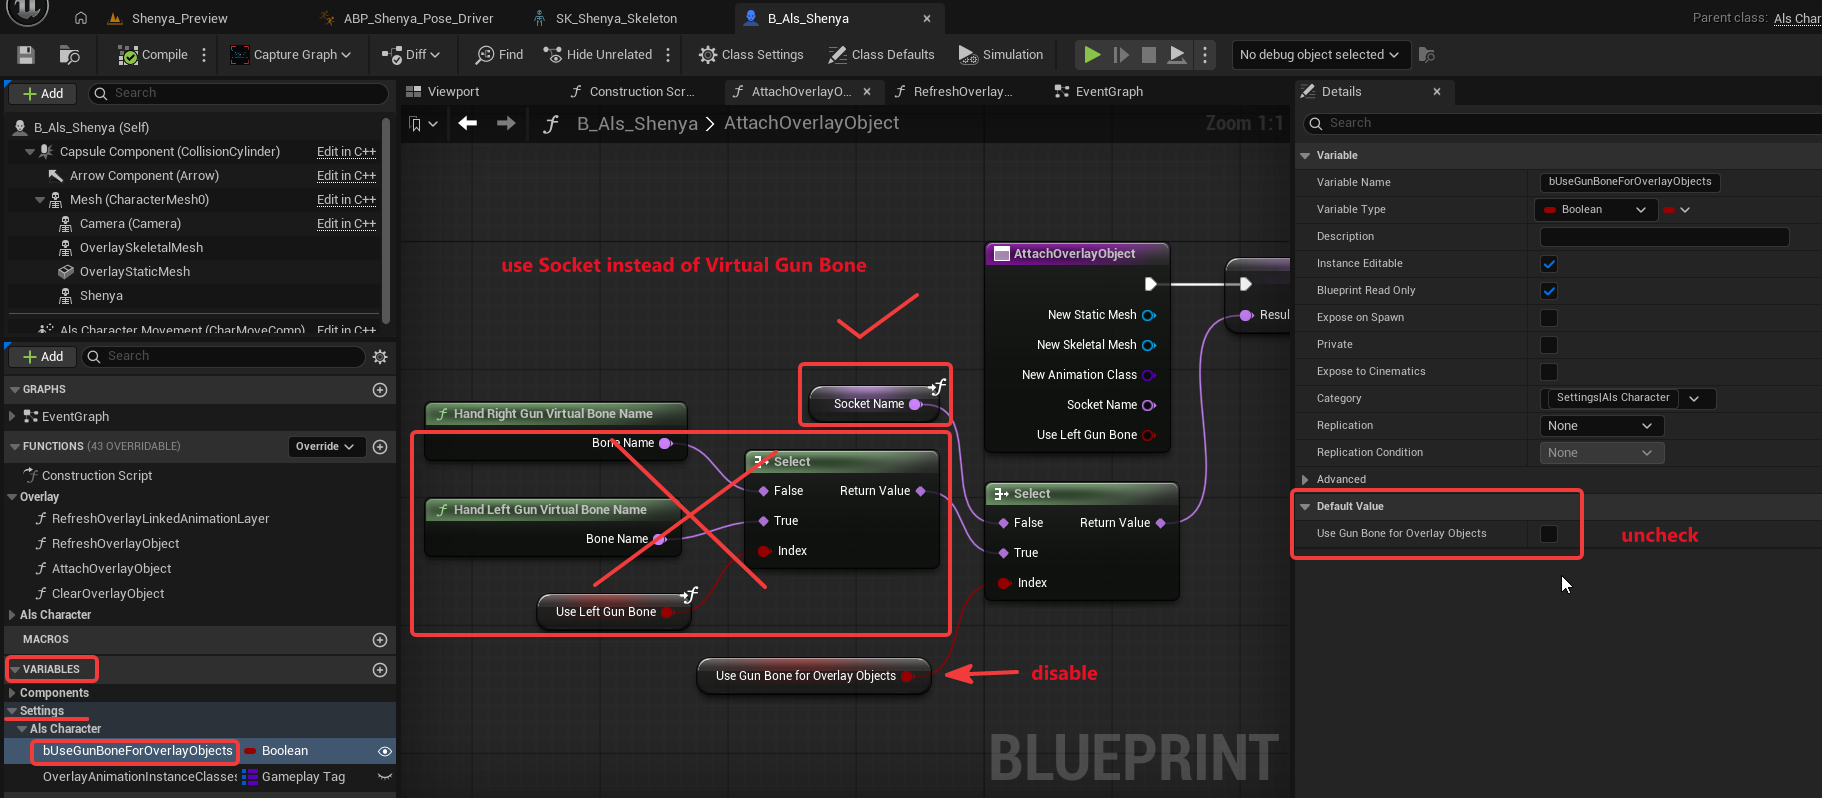
2. Disable Gun-Bone Attachment for Overlay Objects
Section titled “2. Disable Gun-Bone Attachment for Overlay Objects”Open the custom character Blueprint:
/Content/ALS_Shenya/B_Als_ShenyaFind this variable:
bUseGunBoneForOverlayObjectsDisable it.
Why this matters:
- when this is enabled, the overlay object can use the ALS gun-bone attachment path
- when this is disabled, the character can use the socket-based attachment path instead
- for a custom character skeleton, a socket on the visible character skeleton is easier to inspect and tune
3. Change the Attachment Target in AttachOverlayObject
Section titled “3. Change the Attachment Target in AttachOverlayObject”In /Content/ALS_Shenya/B_Als_Shenya, open:
AttachOverlayObject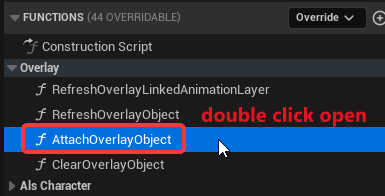
This function contains Attach Component To Component nodes for the overlay object attachment paths. It also receives:
NewStaticMeshNewSkeletalMeshNewAnimationClassSocketNamebUseLeftGunBone
For the rifle path, make sure the attach parent is your visible character mesh component, not the hidden ALS driver mesh.
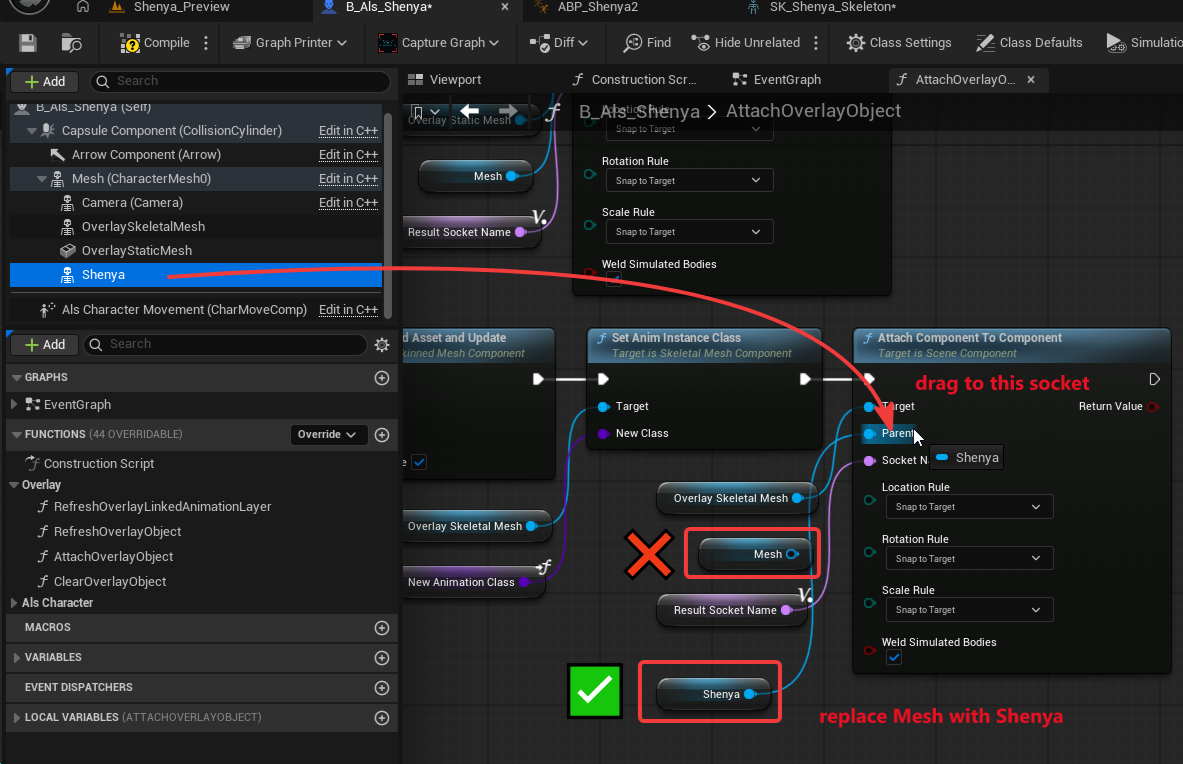
What this changes:
- before: the rifle attaches to the ALS driver mesh
- after: the rifle belongs to the visible character mesh and uses the
Riflesocket created on the custom skeleton.
2. Tune the Right-Hand Rifle Socket
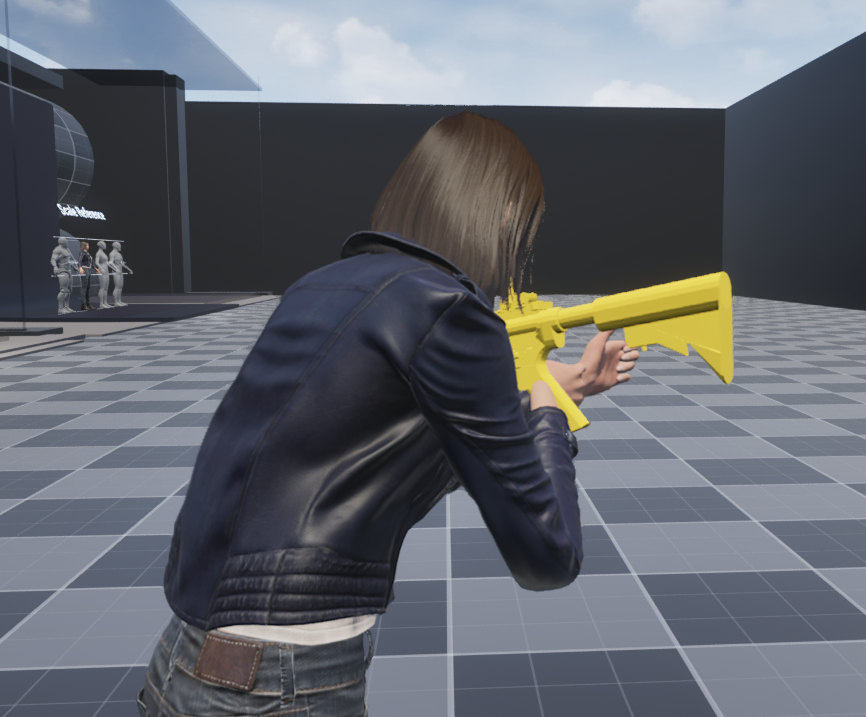
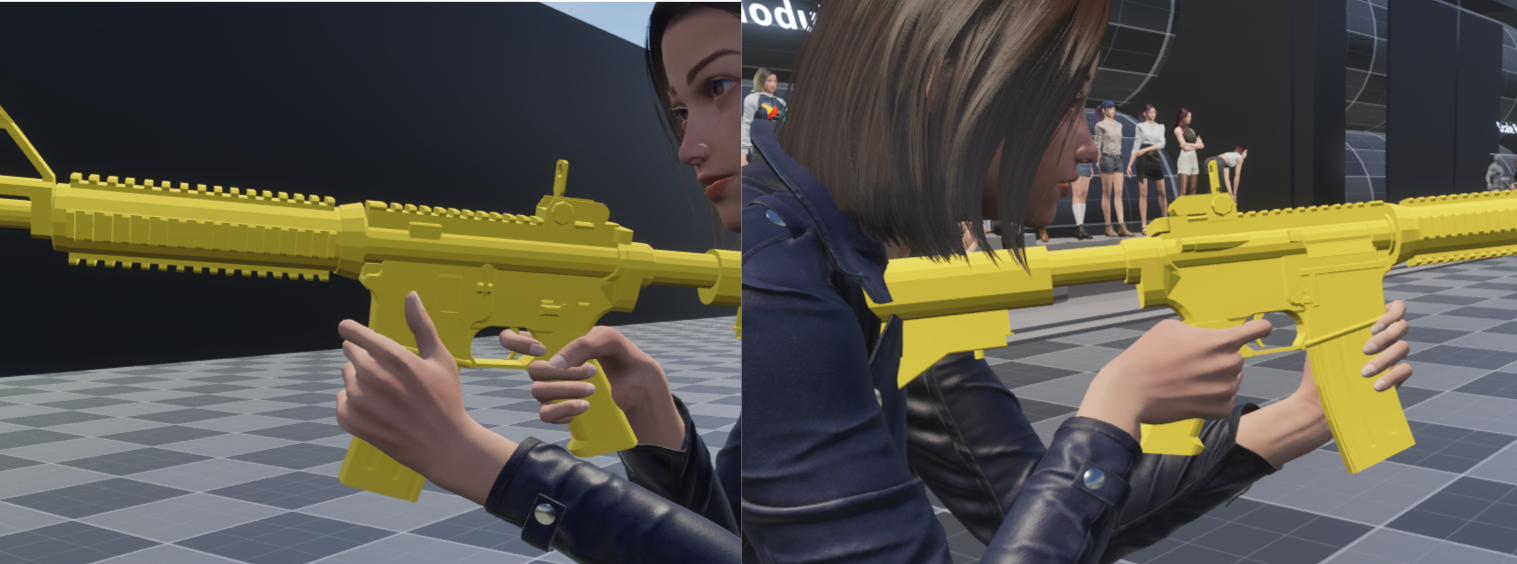
Section titled “2. Tune the Right-Hand Rifle Socket”Compile the Blueprint and test in play mode.
The first result often looks incorrect because the socket exists but has not been aligned yet:
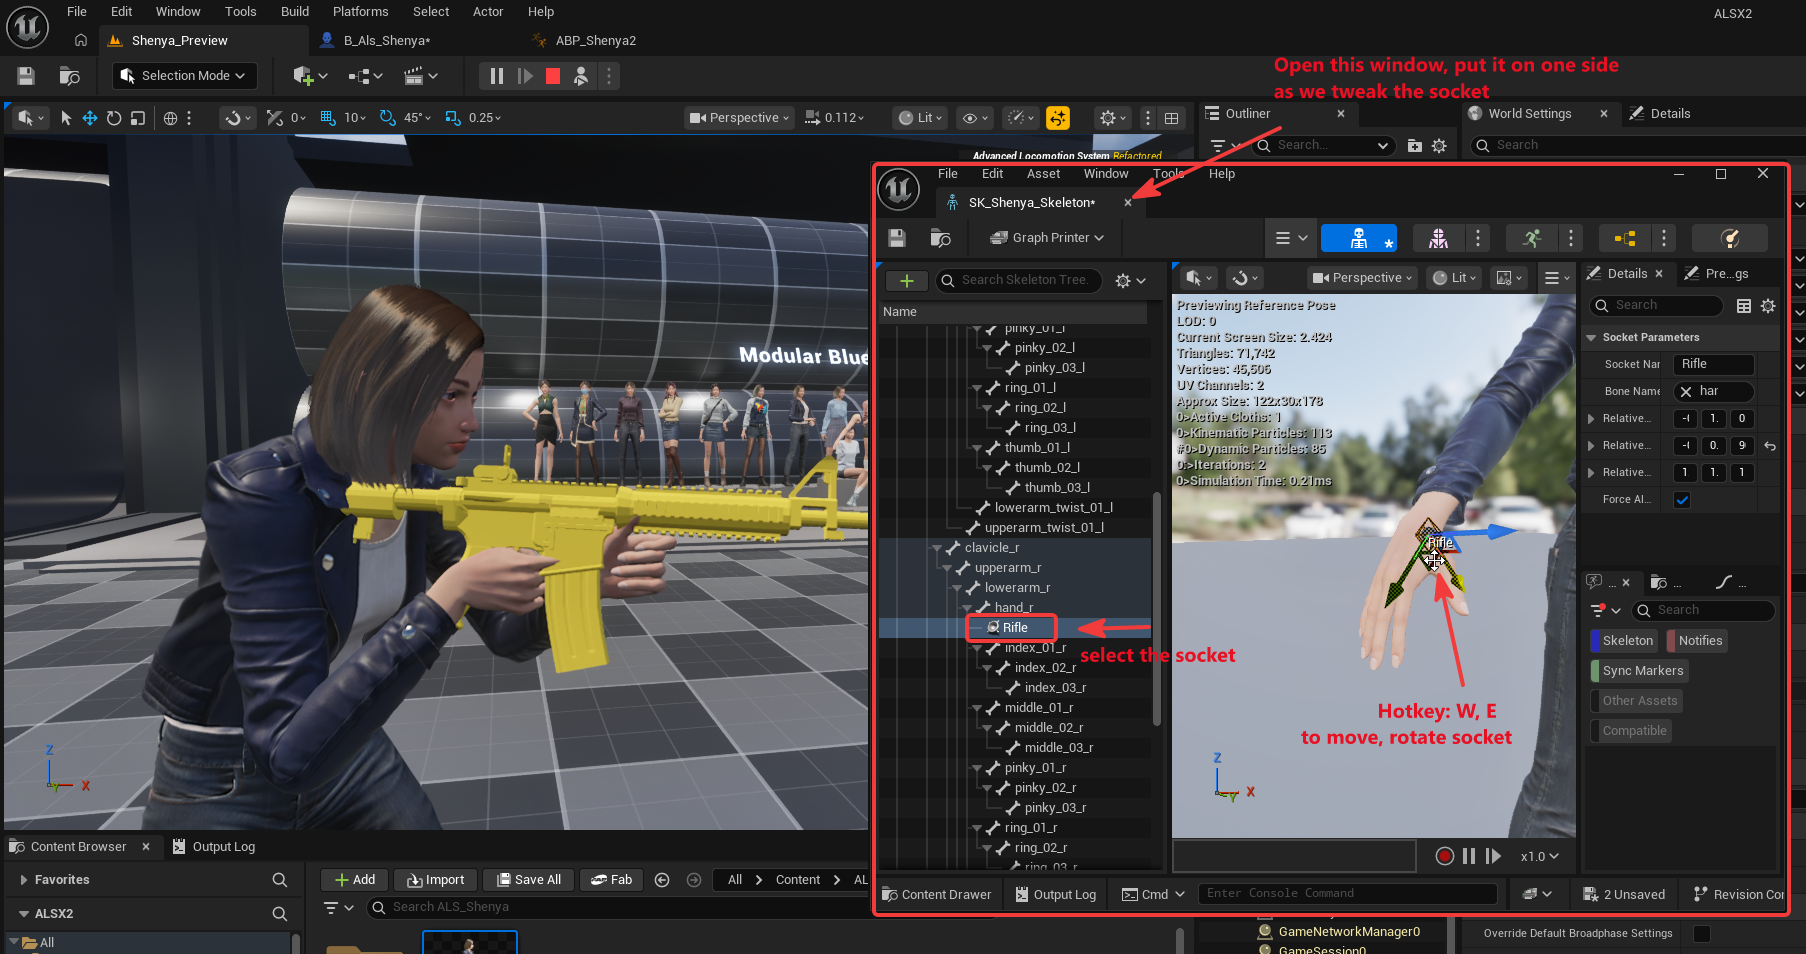
To tune the socket:
- press
F8to eject from the player during PIE - position the camera so the rifle and right hand are visible
- open the character skeleton
- select the
Riflesocket - move and rotate the socket in the skeleton viewport
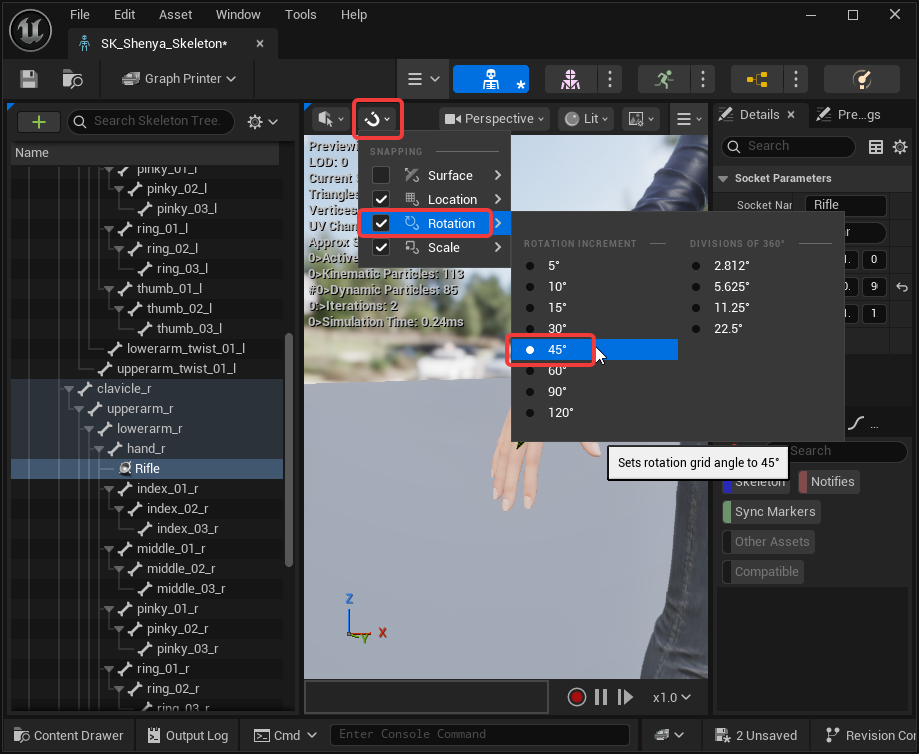
Use larger grid or rotation snap values while blocking in the placement:
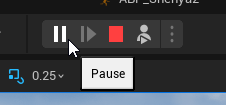
If the animation keeps changing while you are adjusting the socket, pause the game and advance one frame at a time:
After tuning, the rifle should sit closer to the right hand:
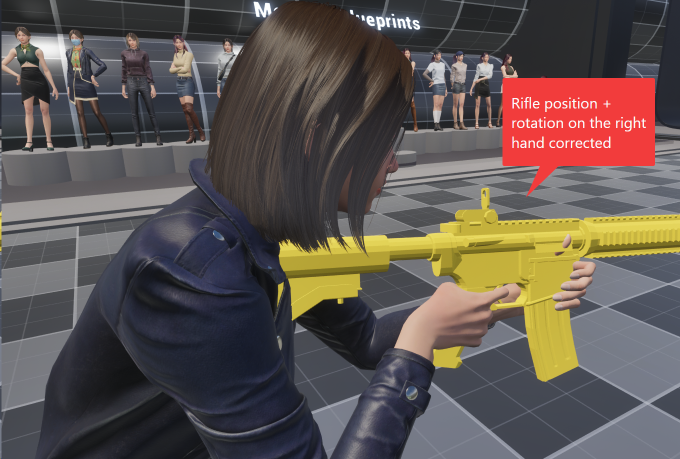
At this stage, only focus on the weapon’s overall right-hand placement. The left hand will be fixed separately.
Left-Hand Grip IK
Section titled “Left-Hand Grip IK”1. Duplicate the Rifle Into Project Content
Section titled “1. Duplicate the Rifle Into Project Content”The left-hand IK needs a socket on the rifle. Do not add custom sockets directly to the plugin rifle assets unless you intentionally want to edit plugin content.
The original ALS rifle assets are under:
/ALS/ALS/OverlayObjects/RifleCopy the rifle skeleton and skeletal mesh into your own project content folder, for example:
/Content/ALS_Shenya/Overlay_Objects/Rifle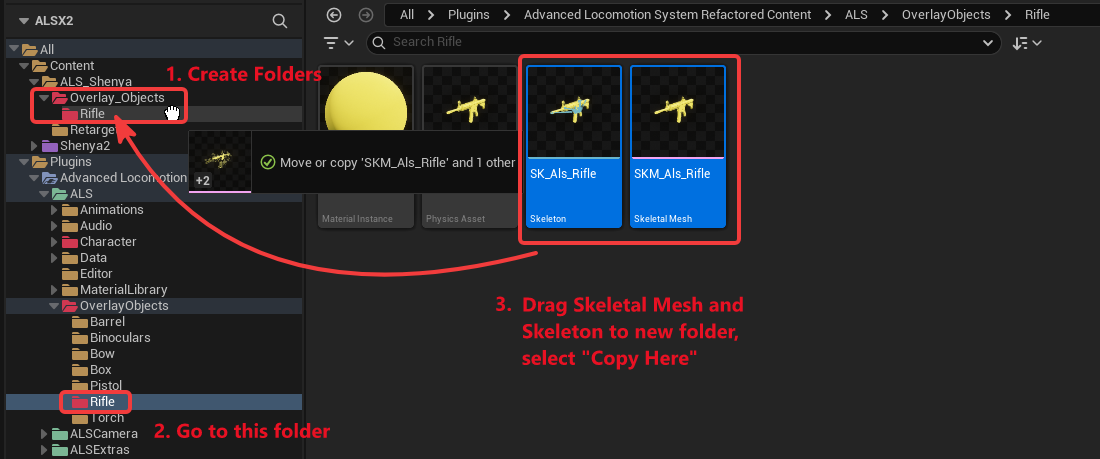
Rename the duplicated assets clearly:
| Asset | Example name |
|---|---|
| Rifle skeleton | SK_Als_Rifle_Shenya |
| Rifle skeletal mesh | SKM_Als_Rifle_Shenya |
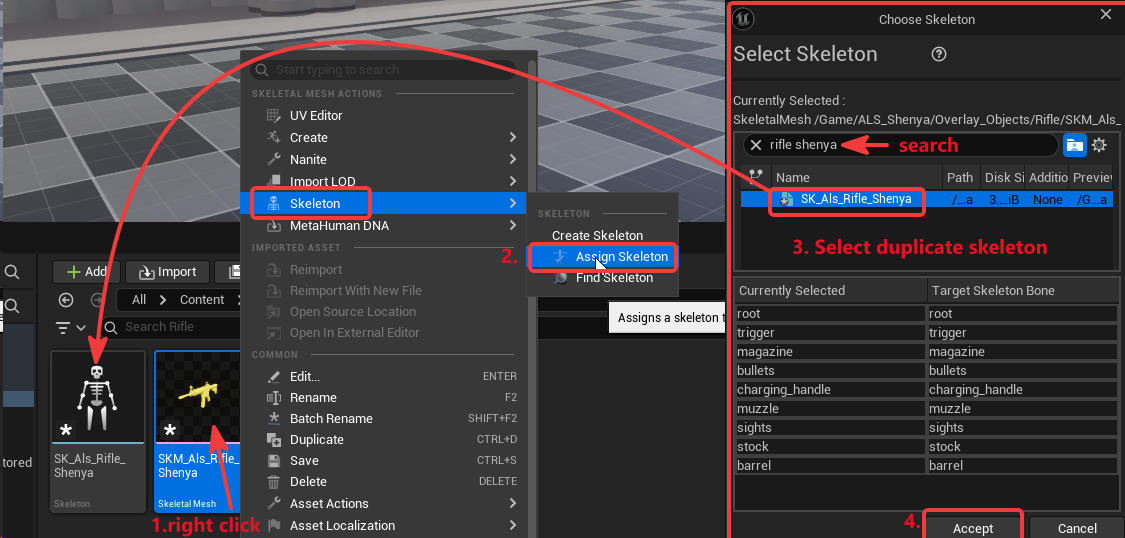
Then assign the duplicated mesh to the duplicated skeleton:
- right-click the duplicated rifle mesh
- choose
Skeleton > Assign Skeleton - choose the duplicated rifle skeleton
2. Add a LeftHandGrip Socket to the Rifle
Section titled “2. Add a LeftHandGrip Socket to the Rifle”Open the duplicated rifle skeleton or rifle mesh and create a socket named:
LeftHandGrip
Place it where the support hand should grip the weapon.
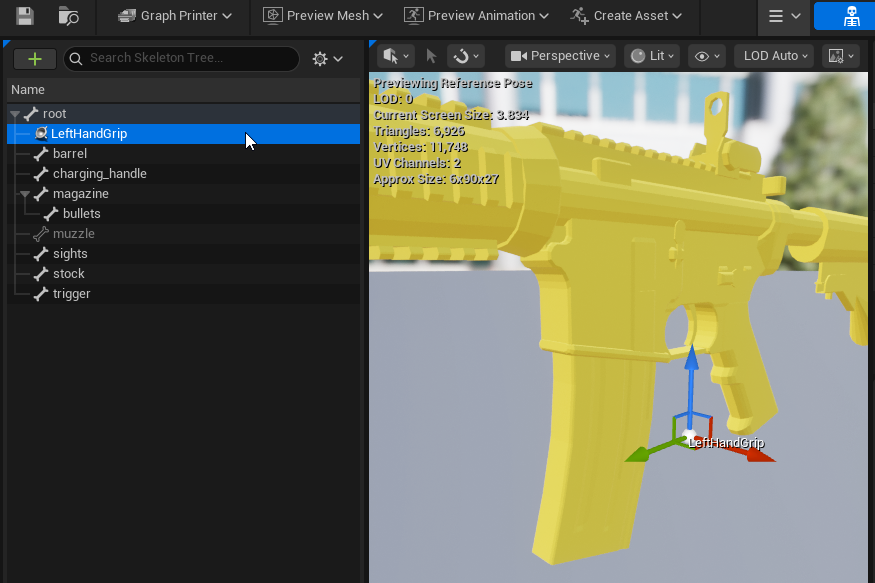
This socket is not the weapon attachment socket. It is a target for the left hand.
The distinction is important:
| Socket | Asset | Purpose |
|---|---|---|
Rifle | character skeleton | attaches the rifle to the right hand |
LeftHandGrip | rifle skeleton or rifle mesh | tells IK where the left hand should move |
Do not spend too long perfecting the LeftHandGrip socket before the Control Rig is connected. Once IK is active, it is easier to see the final hand placement and adjust the socket in context.
3. Create the Left-Hand Control Rig
Section titled “3. Create the Left-Hand Control Rig”Create a Control Rig from your custom character skeletal mesh.
In the example setup, the Control Rig is:
/Content/Shenya2/Meshes/CR_Shenya_LeftHandIK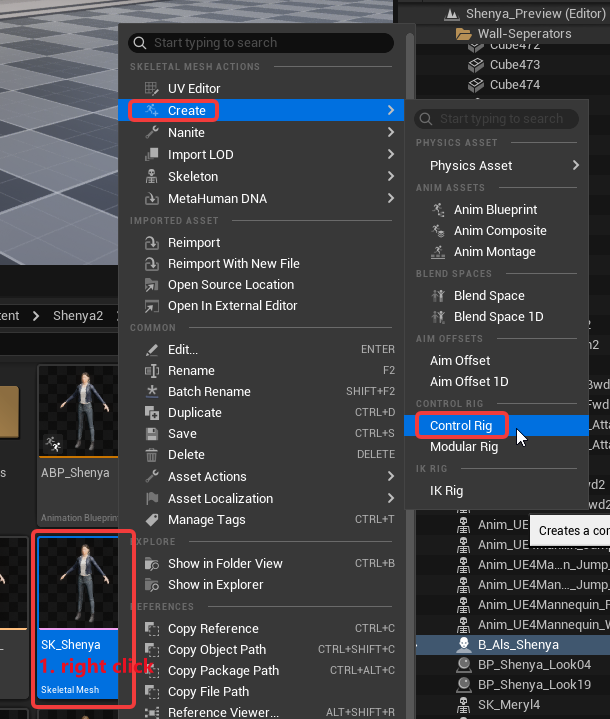
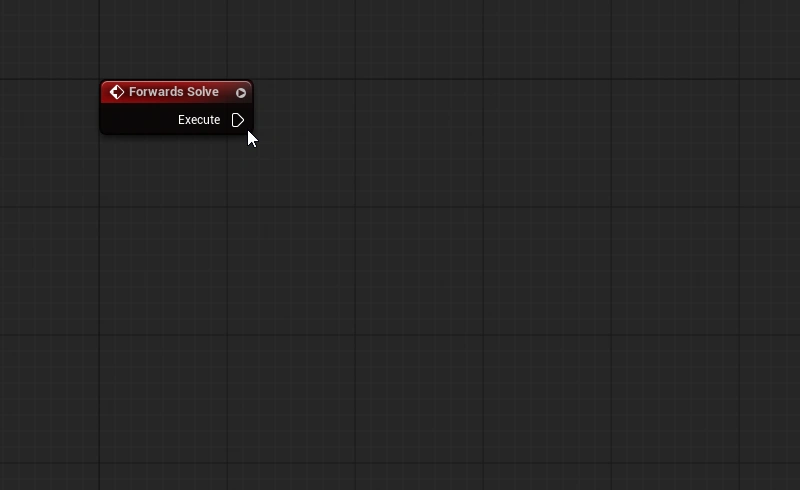
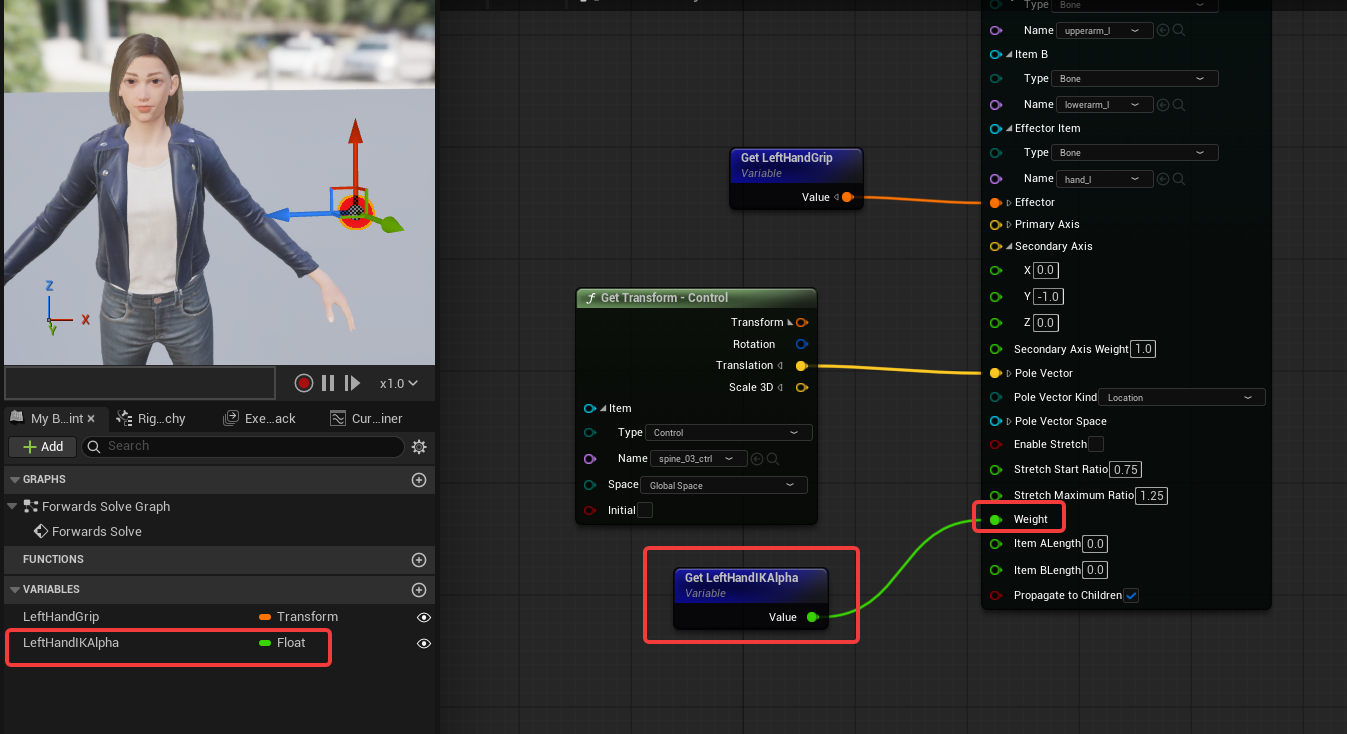
In the Control Rig graph, add a Basic IK node and connect it to the forward solve path:
For the Shenya skeleton, use this left arm chain:
| Basic IK field | Value |
|---|---|
Item A | upperarm_l |
Item B | lowerarm_l |
Effector Item | hand_l |
If your character skeleton uses different bone names, use the matching left upper-arm, lower-arm, and hand bones from your skeleton.
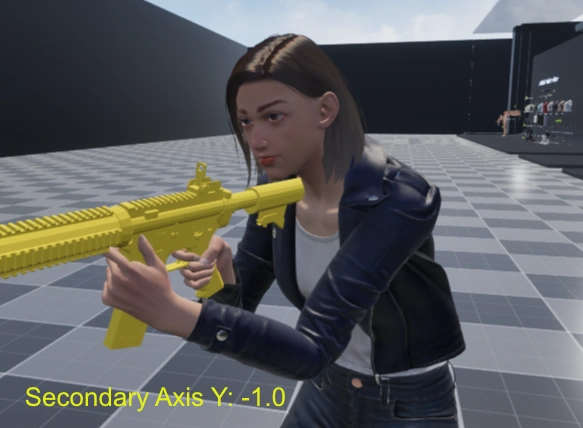
Set the Basic IK secondary axis so the arm bends in the expected direction. In this setup, Secondary Axis Y is set to:
-1.0The secondary axis affects how the IK solver interprets the limb bend direction:
Create a Control Rig variable:
LeftHandGripSet its type to:
TransformExpose it so the Animation Blueprint can pass the rifle grip transform into the Control Rig.
Connect LeftHandGrip to the IK effector transform.
The graph should follow this shape:
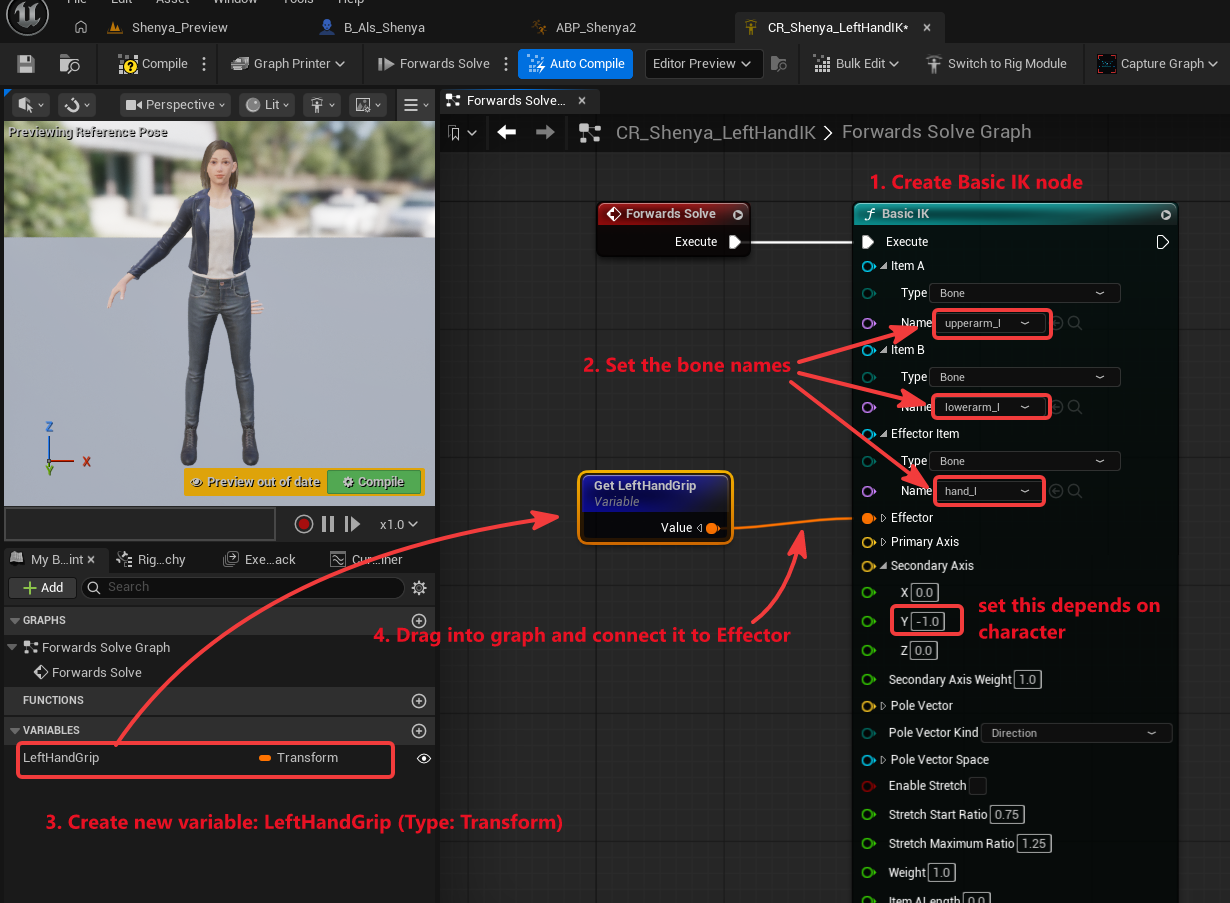
This Control Rig has one narrow job: move the left arm chain so the hand reaches the grip transform supplied by the Animation Blueprint.
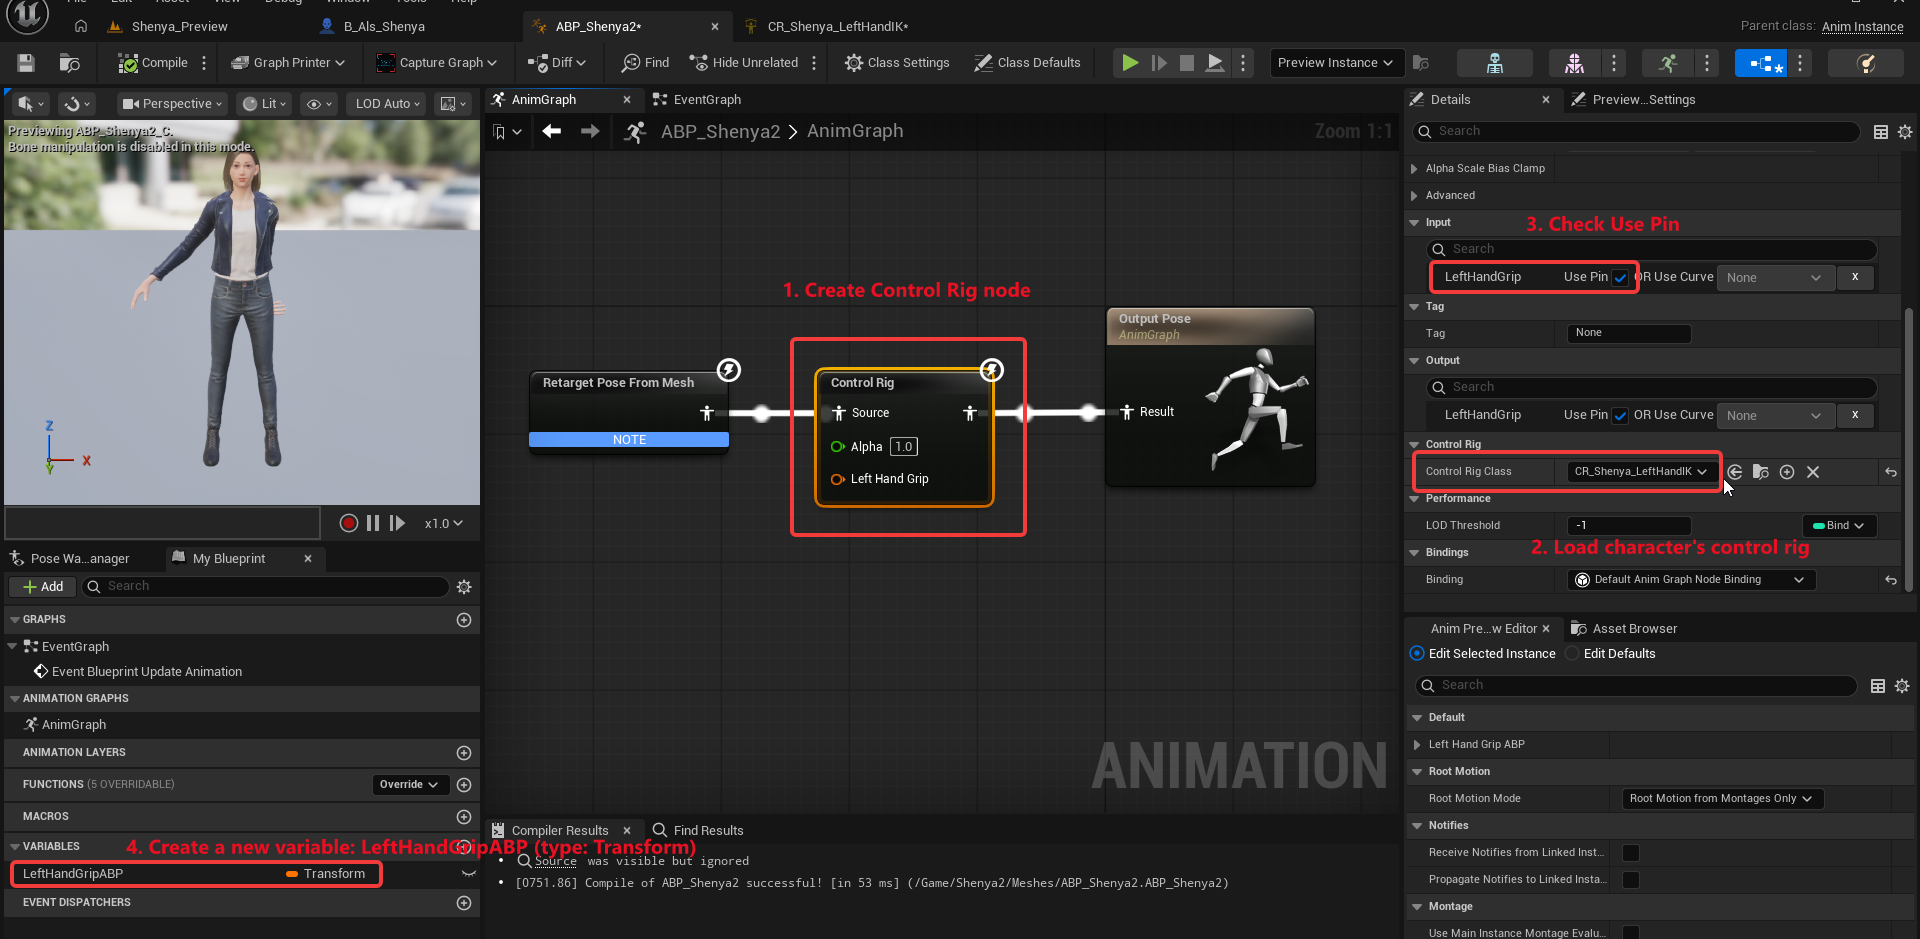
4. Feed the Grip Transform from the Animation Blueprint
Section titled “4. Feed the Grip Transform from the Animation Blueprint”Open the custom Animation Blueprint:
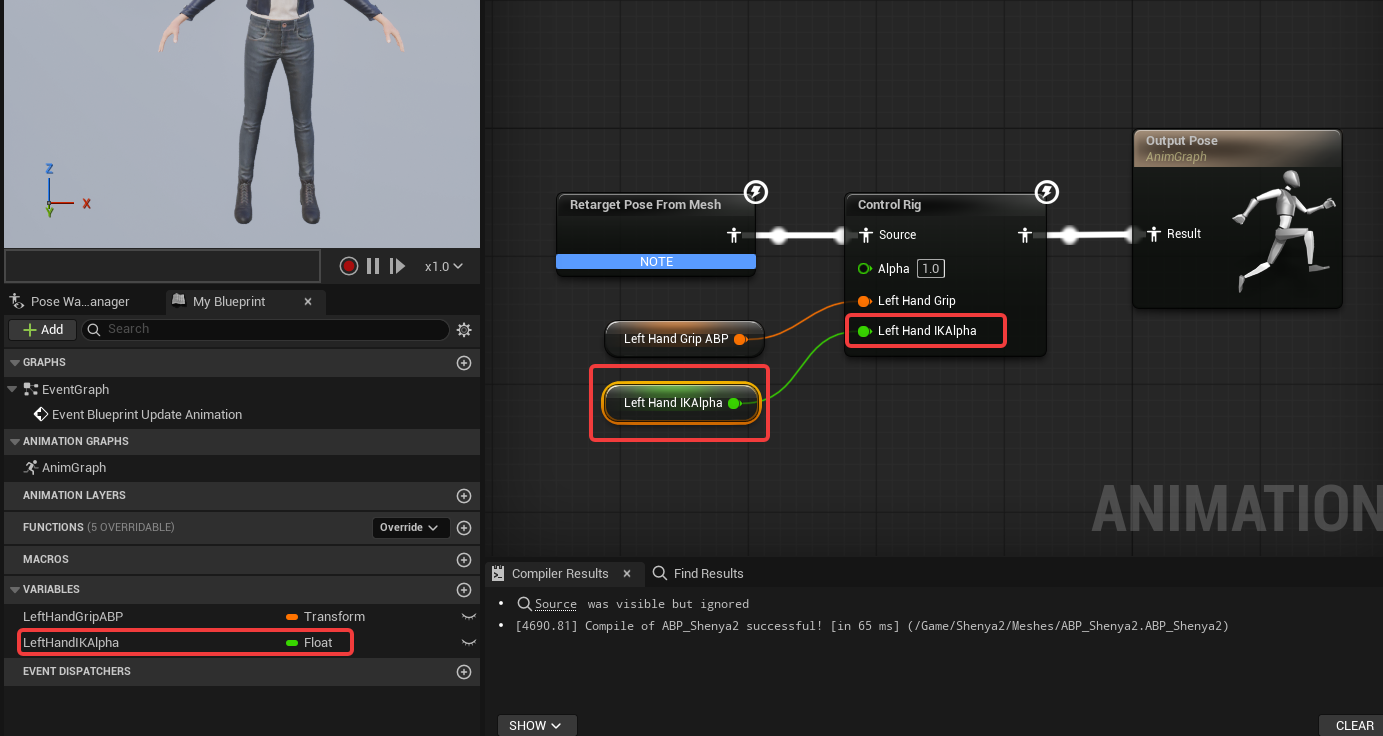
/Content/Shenya2/Meshes/ABP_ShenyaThis Animation Blueprint needs two variables:
| Variable | Type | Purpose |
|---|---|---|
LeftHandGripABP | Transform | stores the rifle grip transform in character-local space |
In the AnimGraph, the pose flow is:
Retarget Pose From Mesh -> Control Rig -> Output PoseThe Control Rig node receives LeftHandGripABP:
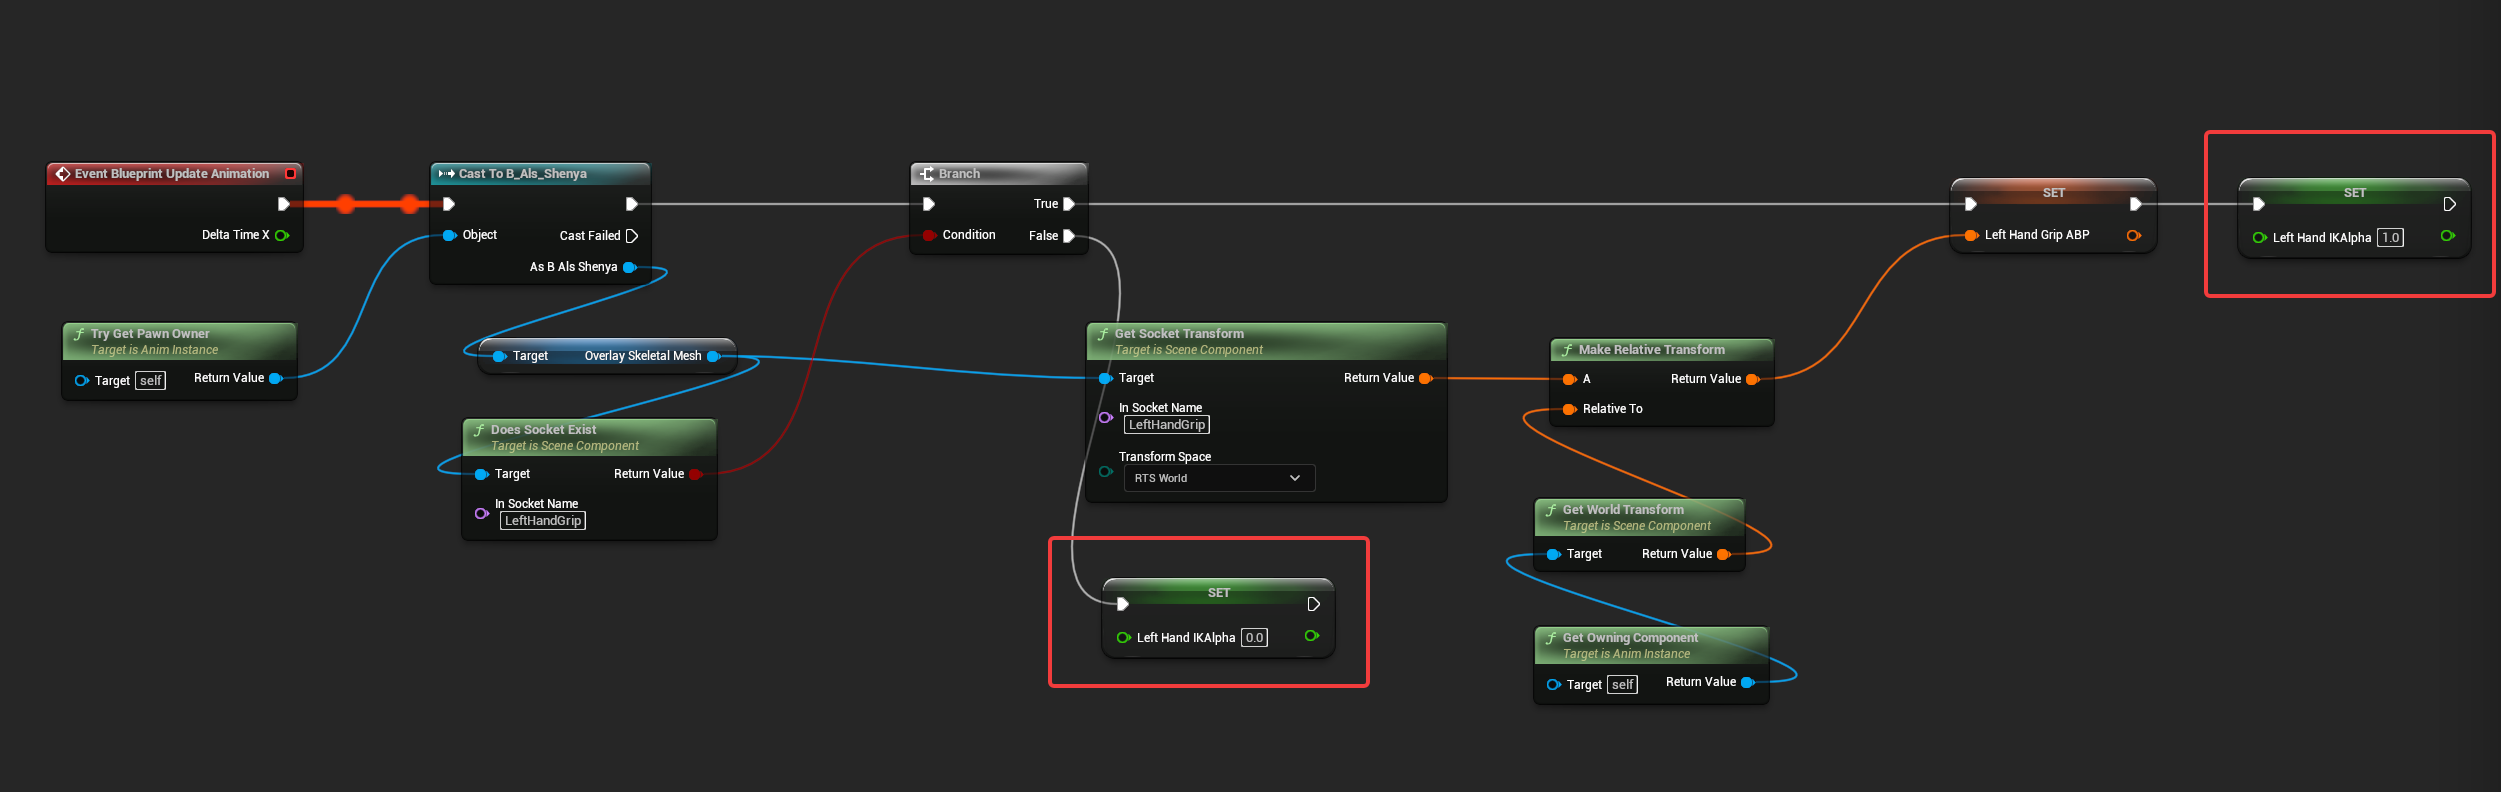
In the Event Graph, update the grip transform during Event Blueprint Update Animation.
The Event Graph should do this:
- gets the owning pawn
- casts it to
B_Als_Shenya - reads the character’s
OverlaySkeletalMesh - checks
Does Socket ExistforLeftHandGrip - if the socket exists, reads
Get Socket Transform - converts the transform with
Make Relative Transform - stores the result in
LeftHandGripABP - sets
LeftHandIKAlphato the enabled value - if the socket does not exist, sets
LeftHandIKAlphato the disabled value
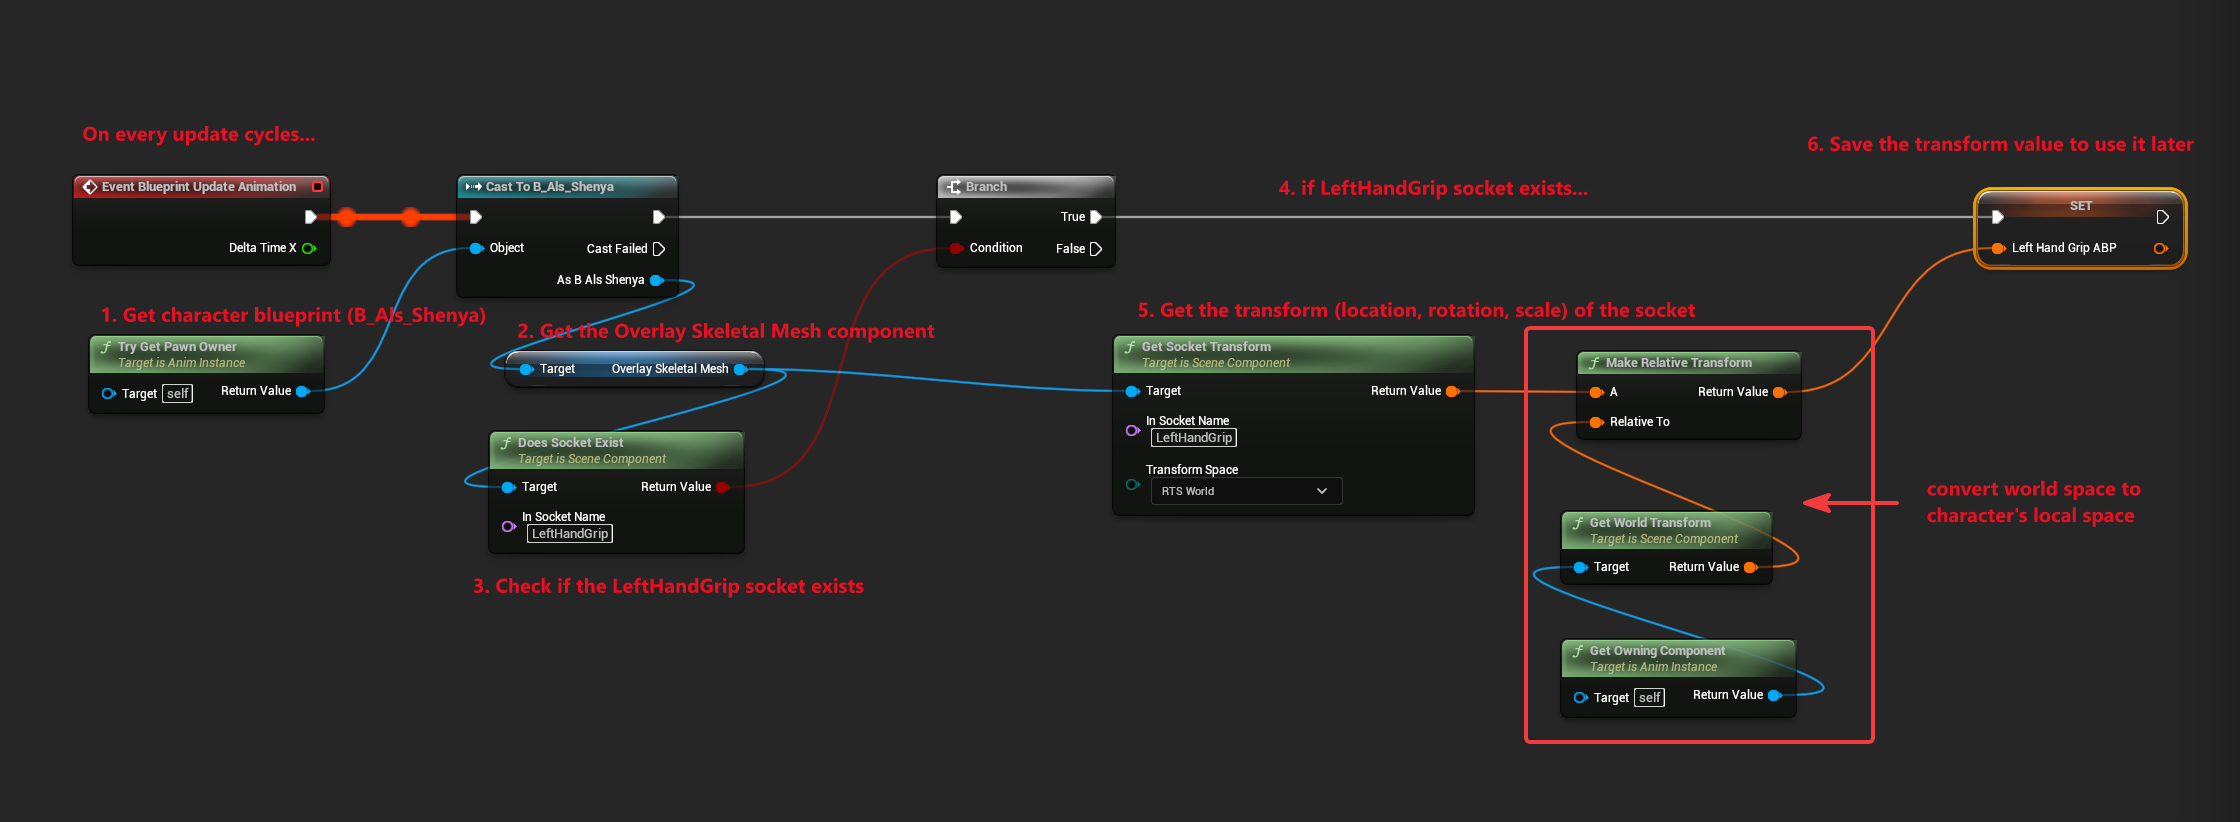
The key safety check is Does Socket Exist. Without it, the Animation Blueprint can feed a stale or default transform into the Control Rig when the rifle is not equipped.
5. Switch the Rifle Overlay to the Custom Rifle
Section titled “5. Switch the Rifle Overlay to the Custom Rifle”The left-hand setup will not work if the character is still using the original ALS rifle mesh, because the original rifle does not contain the custom LeftHandGrip socket.
Open:
/Content/ALS_Shenya/B_Als_ShenyaThen open:
RefreshOverlayObjectThis function uses a Gameplay Tag switch for overlay modes. The rifle branch calls AttachOverlayObject.
For the rifle branch, set the New Skeletal Mesh input to:
/Content/ALS_Shenya/Overlay_Objects/Rifle/SKM_Als_Rifle_Shenya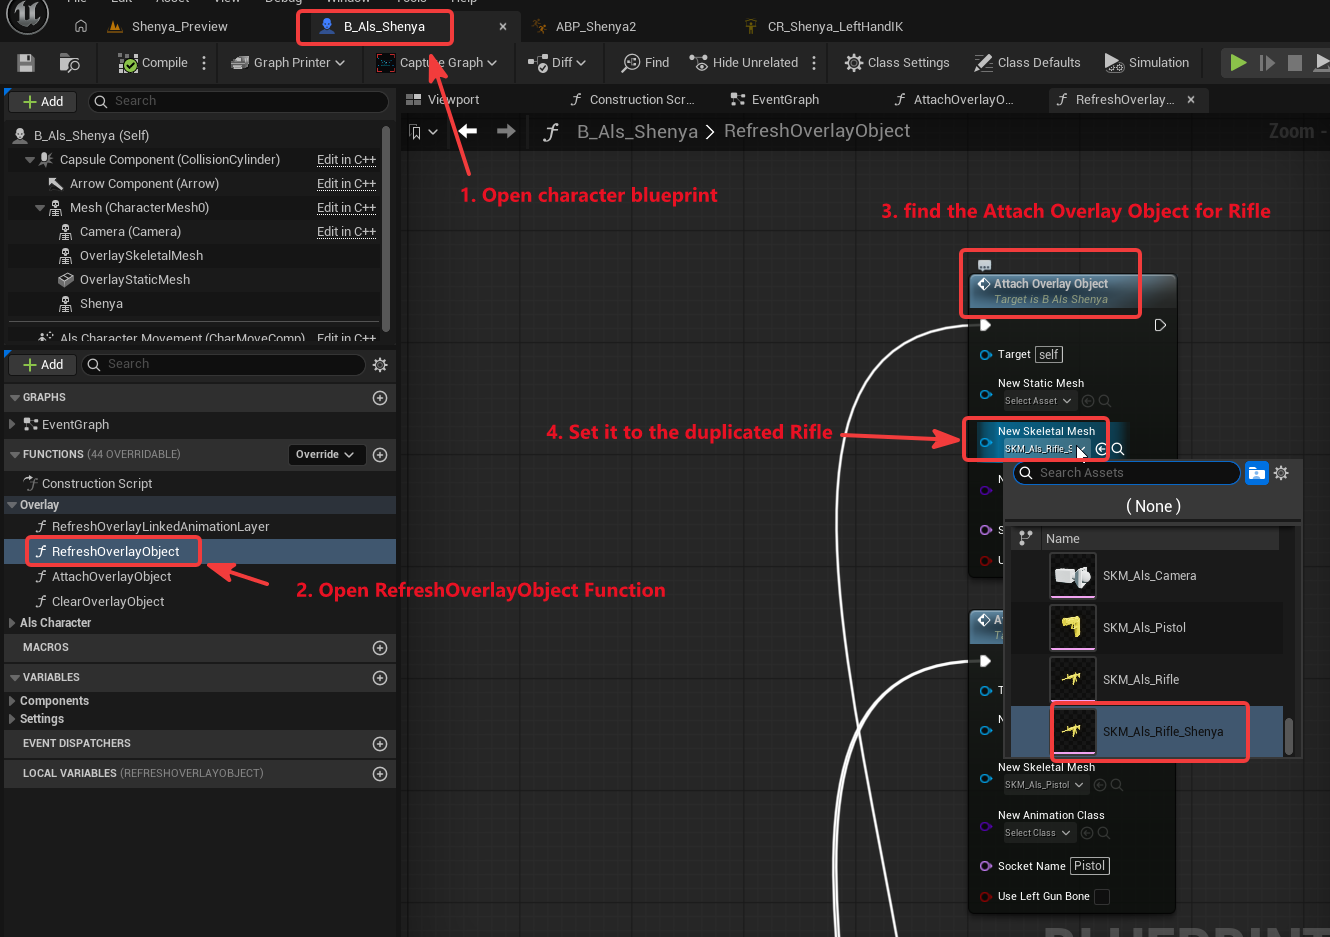
Now, when rifle overlay mode is selected, the character uses the duplicated rifle mesh that contains LeftHandGrip.
Test in play mode. The left hand should now react to the rifle, but the pose may still need socket tuning:
Adjust the LeftHandGrip socket on the duplicated rifle until the support hand sits correctly.
Example LeftHandGrip socket values from the Shenya rifle setup:
(Pitch=34.987129,Yaw=90.000000,Roll=191.700000)(X=2.812969,Y=10.259873,Z=-4.514576)Use those values only as a reference point. Different character proportions, rifle proportions, and skeleton orientations need different socket transforms.
6. Add a Pole Vector for the Elbow
Section titled “6. Add a Pole Vector for the Elbow”After the hand reaches the rifle, the elbow can still bend in an undesirable direction.
A pole vector gives the IK solver an extra direction hint. The hand target tells the solver where the wrist should go; the pole vector helps decide which way the elbow should point while reaching that target.
Without a useful pole vector, the arm can collapse inward, twist toward the body, or flip as the character rotates.
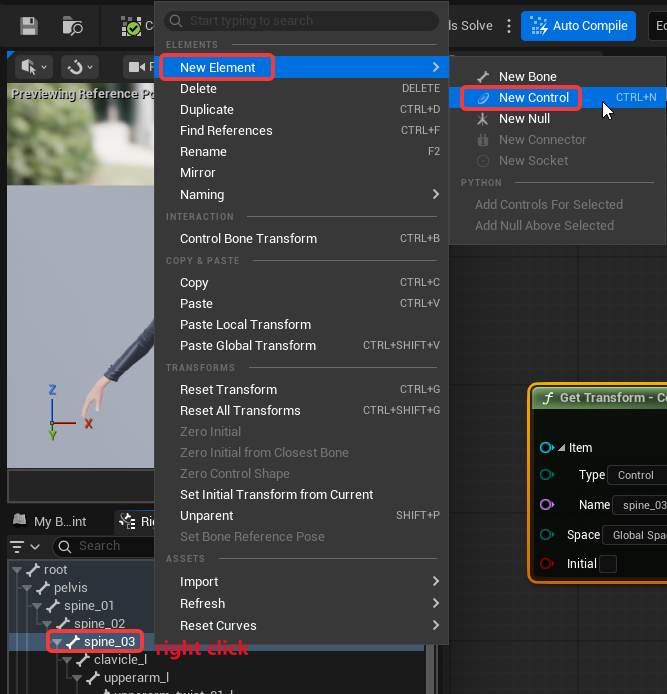
1. Create a Control Near spine_03
Section titled “1. Create a Control Near spine_03”In the Control Rig hierarchy:
- find
spine_03 - right-click it
- choose
New Element > New Control
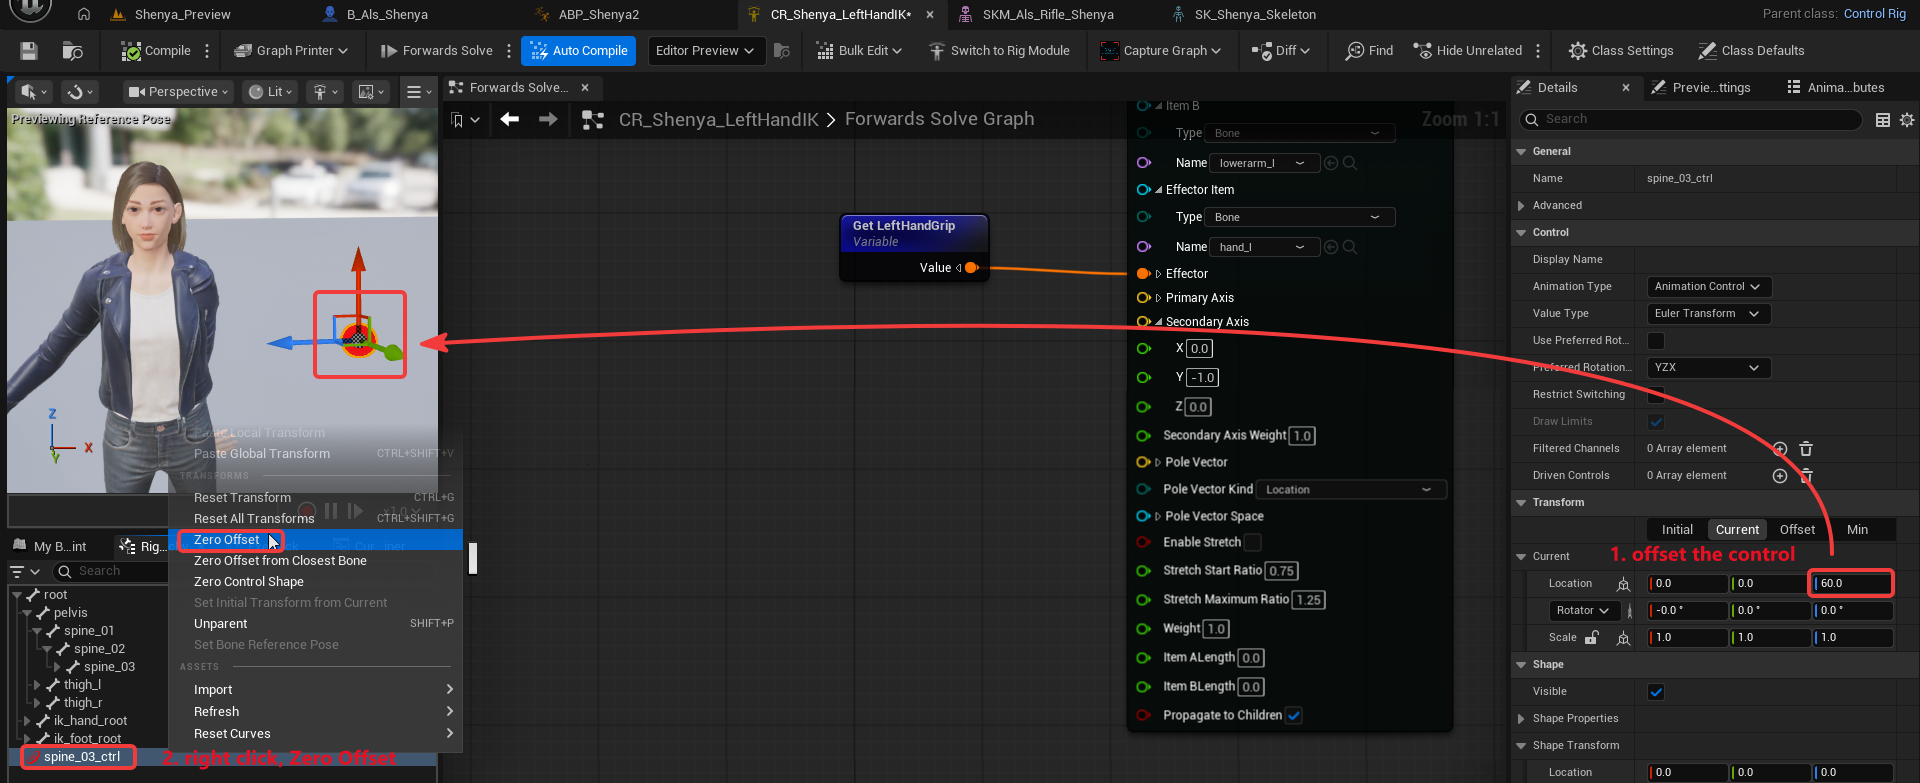
Move the control away from the body in the direction you want the elbow to prefer.
In the example, the control is offset from spine_03. If your rig orientation differs, the useful axis may not be the same. The important result is that the control sits to the side of the character, not directly inside the arm chain.
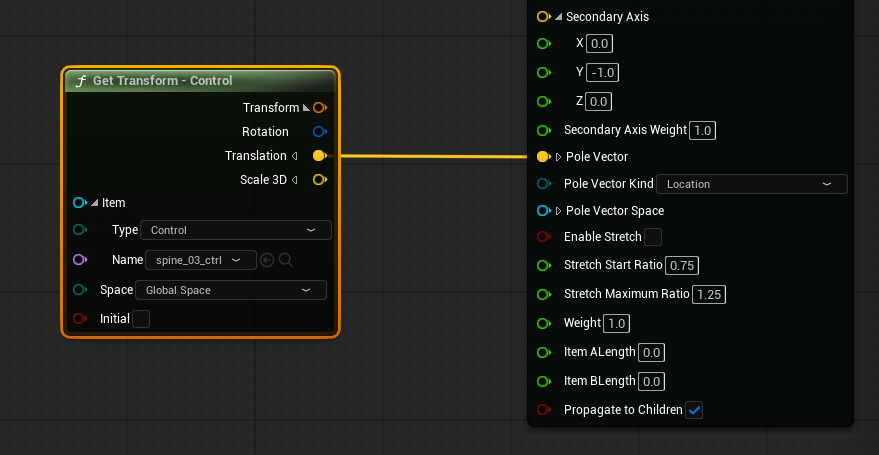
2. Connect the Control to the Basic IK Pole Vector
Section titled “2. Connect the Control to the Basic IK Pole Vector”Drag the new control into the graph as a Get Transform - Control node.
Expand the transform output and connect its Translation to the Basic IK node’s Pole Vector input.
Set Pole Vector Kind to Location
Compile and test again.
The elbow should now bend more consistently:
7. Disable Left-Hand IK When No Grip Socket Exists
Section titled “7. Disable Left-Hand IK When No Grip Socket Exists”The Control Rig should not keep pulling the left hand toward a grip target when the current overlay object does not provide one.
The Animation Blueprint handles this with LeftHandIKAlpha:
- if
OverlaySkeletalMeshhas aLeftHandGripsocket, updateLeftHandGripABPand enable the IK - if it does not, disable the IK
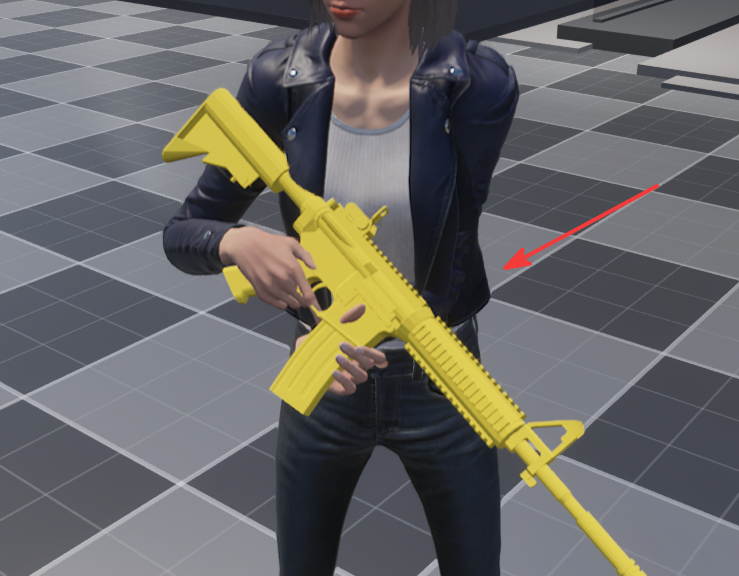
This prevents the left arm from being pulled by a default, missing, or stale grip transform.
Before the activation fix, the arm can enter an incorrect pose when the rifle grip is not available:
1. Set LeftHandIKAlpha in the Animation Blueprint
Section titled “1. Set LeftHandIKAlpha in the Animation Blueprint”In /Content/Shenya2/Meshes/ABP_Shenya, keep the socket check in the Event Graph.
When Does Socket Exist returns true for LeftHandGrip:
- update
LeftHandGripABP - set
LeftHandIKAlphato the enabled value
When it returns false:
- set
LeftHandIKAlphato the disabled value
2. Pass the Alpha into the Control Rig Node
Section titled “2. Pass the Alpha into the Control Rig Node”In the AnimGraph, expose the Control Rig input pin for the alpha and connect the Animation Blueprint variable.
3. Use the Alpha inside the Control Rig
Section titled “3. Use the Alpha inside the Control Rig”Create a matching exposed alpha variable in the Control Rig and use it to control the IK influence.
After this setup, the left-hand IK only affects the pose when a valid LeftHandGrip socket is available.
Result
Section titled “Result”At the end of this setup:
- the rifle attaches to a
Riflesocket on the visible character skeleton - the rifle overlay uses a duplicated project-owned rifle mesh
- the duplicated rifle provides a
LeftHandGripsocket - the Animation Blueprint reads the grip socket from
OverlaySkeletalMesh - the Control Rig moves the left arm toward the grip
- the pole vector gives the elbow a stable bend direction
LeftHandIKAlphadisables the left-hand correction when the grip socket is not available
This keeps the weapon alignment data close to the assets that need it: right-hand placement lives on the character skeleton, and left-hand grip placement lives on the weapon.