2. Character Setup
Overview
Section titled “Overview”This guide shows how to take the sample ALS character setup and adapt it for your own character mesh.
The approach used here is:
- duplicate the sample character Blueprint instead of editing plugin assets directly
- keep the original ALS mesh hidden in the Blueprint as the animation driver
- add your own character mesh as a second skeletal mesh component
- use
Retarget Pose from Meshso your character follows the ALS mesh animation in real time

This guide uses the author’s updated character Shenya2, but the same workflow applies to other characters with a compatible humanoid setup.
What You Will End Up With
Section titled “What You Will End Up With”By the end of this guide, you should have:
- a duplicate of
/ALS/Character/B_Als_Character - a new character mesh component for your own skeletal mesh
- a retargeter asset created from
AB_Als - a small Animation Blueprint that copies ALS pose data onto your character
- a playable character Blueprint that works with
B_Als_GameModeand the sample ALS UI
Before You Start
Section titled “Before You Start”This guide assumes:
- you already completed the ALS plugin setup
- your character is already imported into the project
- your character has a usable skeletal mesh
- you want to create your own playable character without modifying plugin assets directly
Character Blueprint Setup
Section titled “Character Blueprint Setup”1. Import Your Character and Create a Working Folder
Section titled “1. Import Your Character and Create a Working Folder”Import your character into the project first.
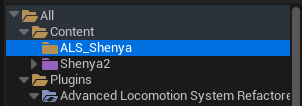
This guide uses Shenya2, with assets under /Content/Shenya2/....
Create a folder where you want to keep the assets you make during this guide.
For example:
Content/ALS_ShenyaCreating a separate working folder helps keep the retarget assets, Blueprints, and helper assets organized.
2. Duplicate B_Als_Character
Section titled “2. Duplicate B_Als_Character”Source character Blueprint:
/ALS/Character/B_Als_CharacterDo not edit the plugin copy directly.
The main reason is simple: B_Als_Character belongs to the plugin. If the plugin is updated later, you do not want your custom character setup mixed into plugin content.
The safer workflow is:
- keep plugin assets unchanged
- duplicate the Blueprint into your own content folder
- customize the duplicate
The original plugin asset lives in the character folder shown here:

Duplicate B_Als_Character into your own folder.
For example:
Content/ALS_Shenya/B_Als_Shenya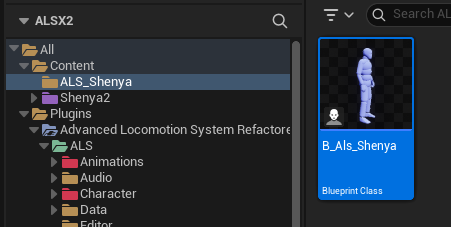
Open the duplicated Blueprint.
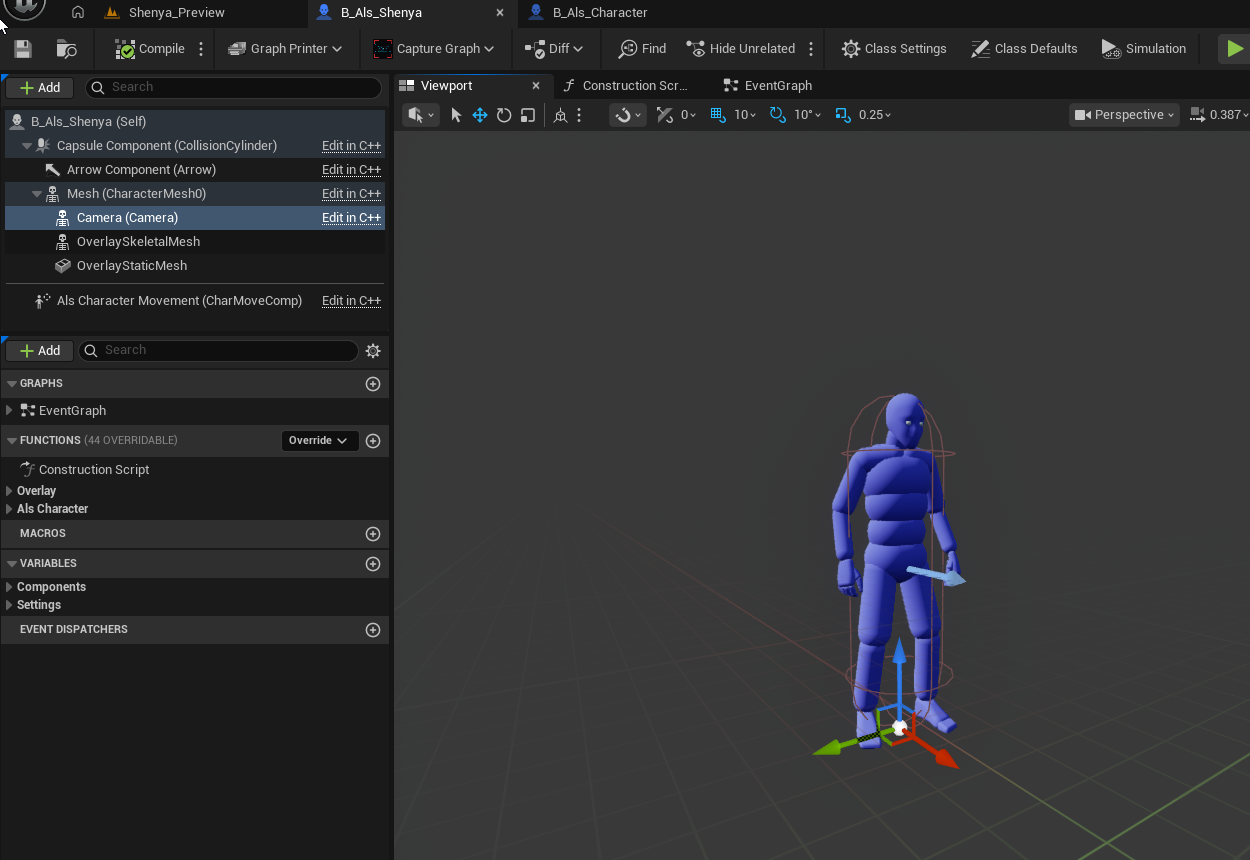
3. Check Inherited Defaults Before You Continue
Section titled “3. Check Inherited Defaults Before You Continue”This is one of the easiest places to get confused.
When you duplicate the Blueprint, some inherited component settings may not look the way you expect inside the duplicate, especially on the Camera component. If something looks empty or wrong, compare your duplicate against the original B_Als_Character.
Select the Camera component in your duplicate:
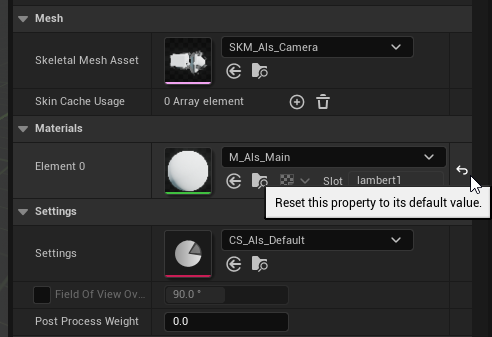
The original ALS sample uses:
- camera mesh:
/ALS/ALSCamera/SKM_Als_Camera - camera animation Blueprint:
/ALS/ALSCamera/AB_Als_Camera
If your duplicate does not appear to carry those values over correctly in the editor, use the reset arrow or manually restore the original values.
This sanity check against the original is a good habit throughout this guide. The duplicate should behave like the sample first, then we add your custom mesh on top.
Visible Mesh Setup
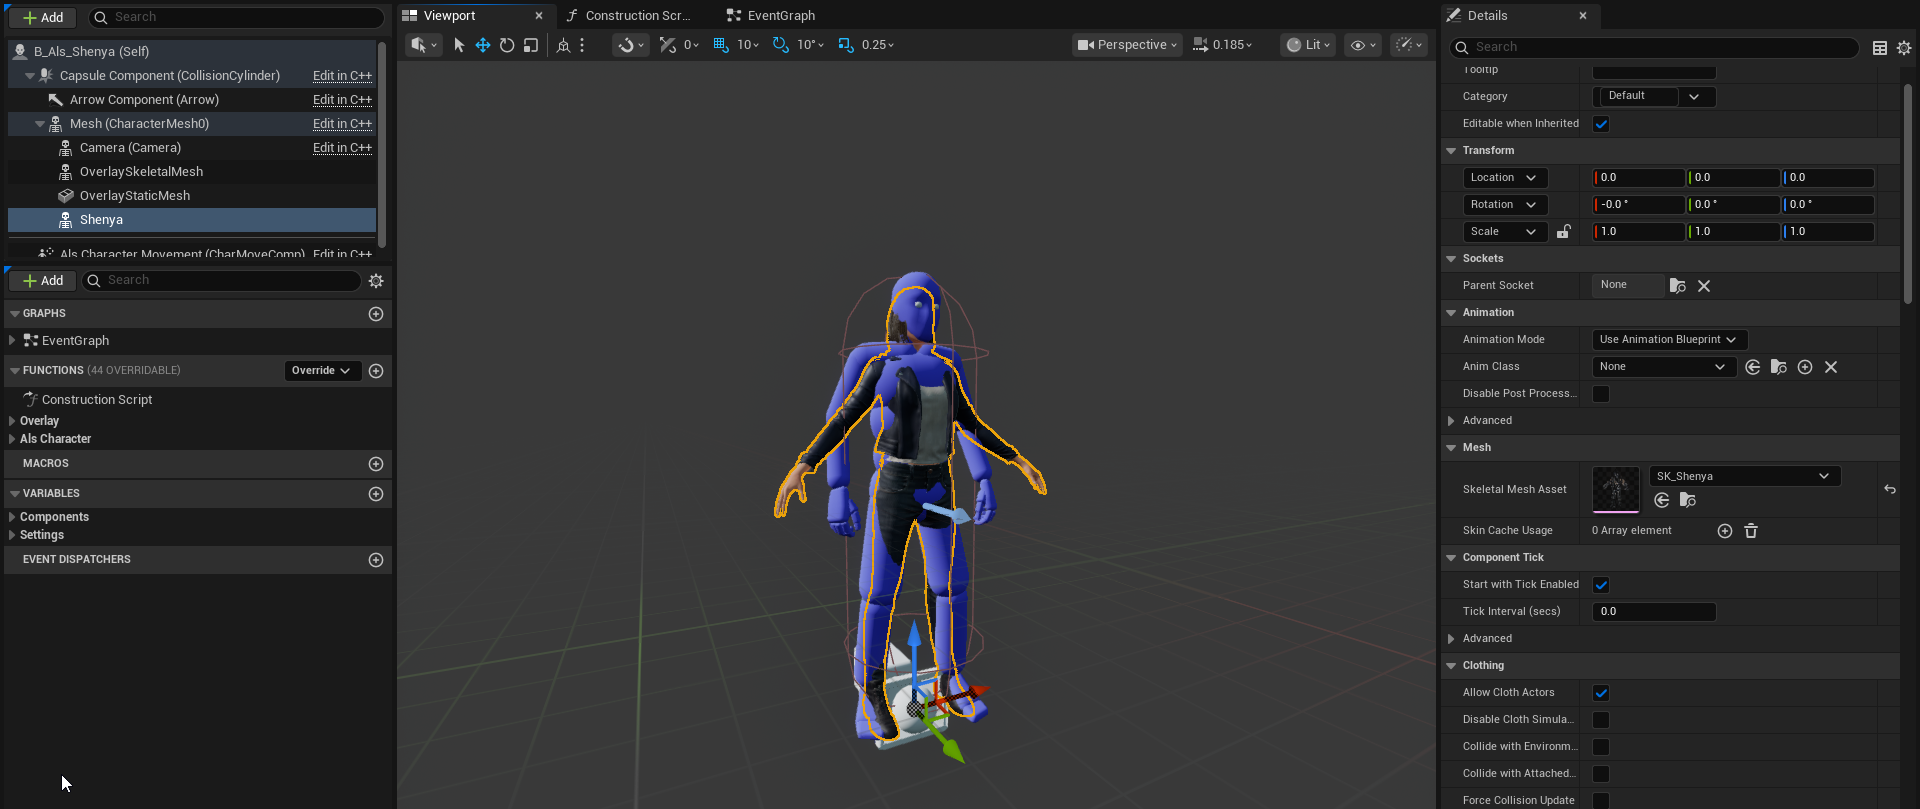
Section titled “Visible Mesh Setup”1. Add Your Character Mesh as a New Skeletal Mesh Component
Section titled “1. Add Your Character Mesh as a New Skeletal Mesh Component”At this point, do not replace the original ALS mesh.
Instead, create a new skeletal mesh component under the existing ALS mesh hierarchy and assign your own character mesh to it.
In this example, that new component is named Shenya.
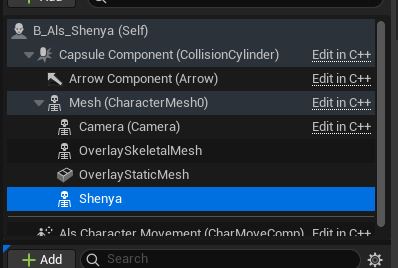
Assign your character skeletal mesh to that new component.
For the example character, that is SK_Shenya2 under /Content/Shenya2/Meshes/....
Why We Keep the ALS Mesh
Section titled “Why We Keep the ALS Mesh”This is the key idea behind the whole setup.
The most important reason we keep the ALS mesh is that your character skeleton is not the same skeleton as the ALS skeleton.
That difference can show up in several ways:
- different bone proportions
- different overall scale
- different bone names
- different hierarchy or extra bones
Because of that, you usually cannot just replace the ALS skeletal mesh and expect the plugin’s animation setup to keep working.
The original ALS mesh remains in the Blueprint because it already knows how to:
- run the ALS animation Blueprint
- drive locomotion state
- feed the camera and overlay systems
- produce the source pose we want to copy
Your custom mesh is going to follow that ALS mesh through retargeting.
That means:
- the ALS mesh is the hidden animation driver
- your mesh is the visible presentation mesh
This is why we add a second skeletal mesh component instead of swapping the original one out.
Animation Retargeting Setup
Section titled “Animation Retargeting Setup”1. Create Retarget Assets from AB_Als
Section titled “1. Create Retarget Assets from AB_Als”Now we need the retarget setup that converts ALS animation pose data to your character skeleton.
Start from the ALS animation Blueprint:
/ALS/Character/AB_AlsRight-click AB_Als and choose Retarget Animations.
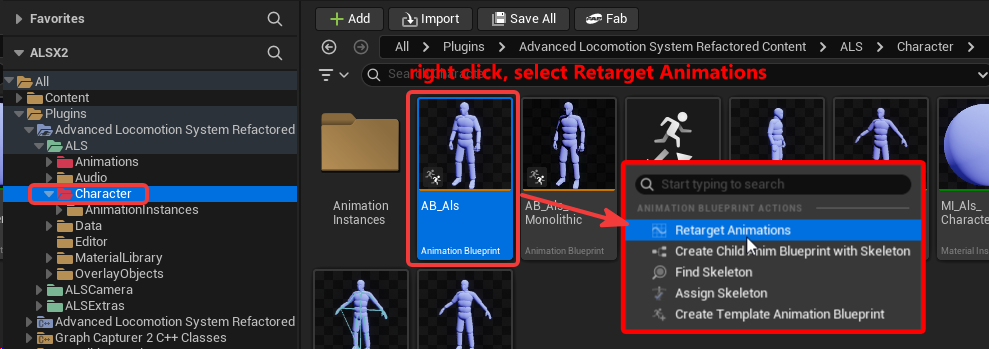
In the Retarget Animations window:
- set the Target Skeletal Mesh to your character mesh
- confirm the source is ALS
- export the retarget assets
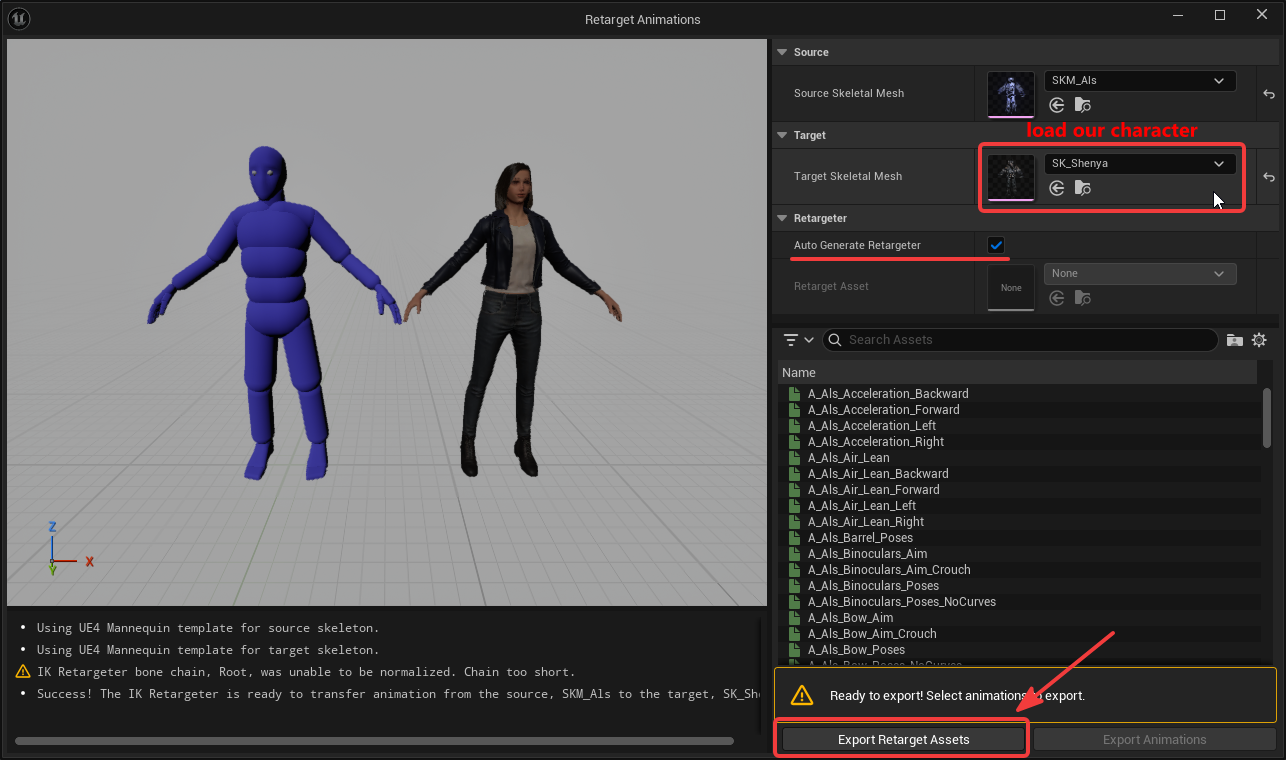
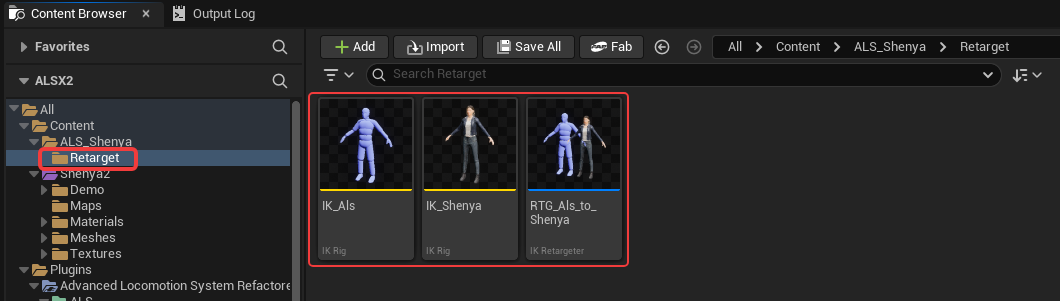
Create a new folder for the retarget assets so they stay grouped together.
For example:
Content/ALS_Shenya/Retarget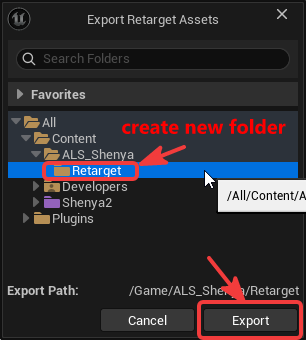
Rename the generated assets clearly.
For example:
IK_AlsIK_ShenyaRTG_Als_to_Shenya
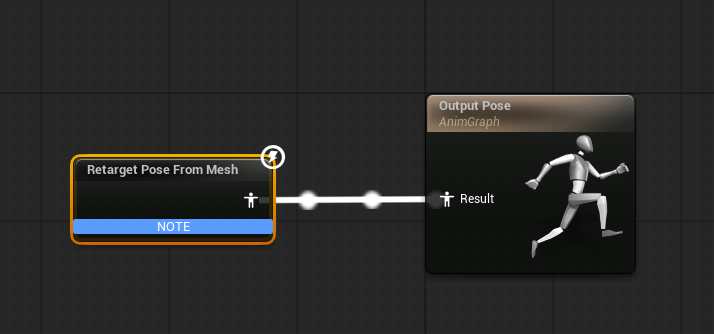
2. Create a Small Animation Blueprint for Your Character
Section titled “2. Create a Small Animation Blueprint for Your Character”Now create an Animation Blueprint for your character’s skeletal mesh.
Right-click your skeletal mesh and choose:
Create > Anim Blueprint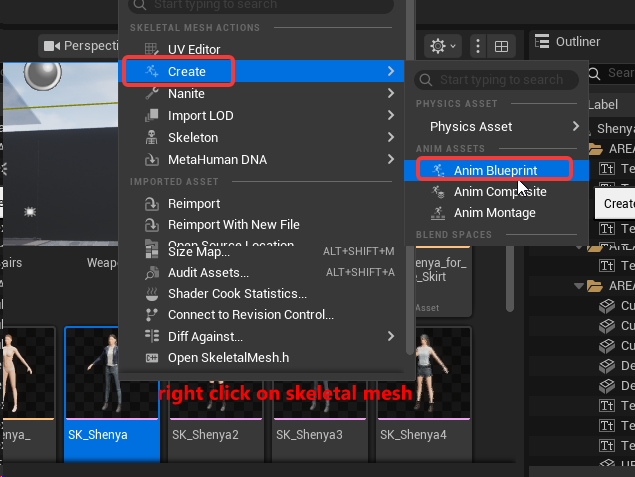
For example, name it:
ABP_ShenyaOpen the Animation Blueprint and go to the AnimGraph.
Add a Retarget Pose from Mesh node.
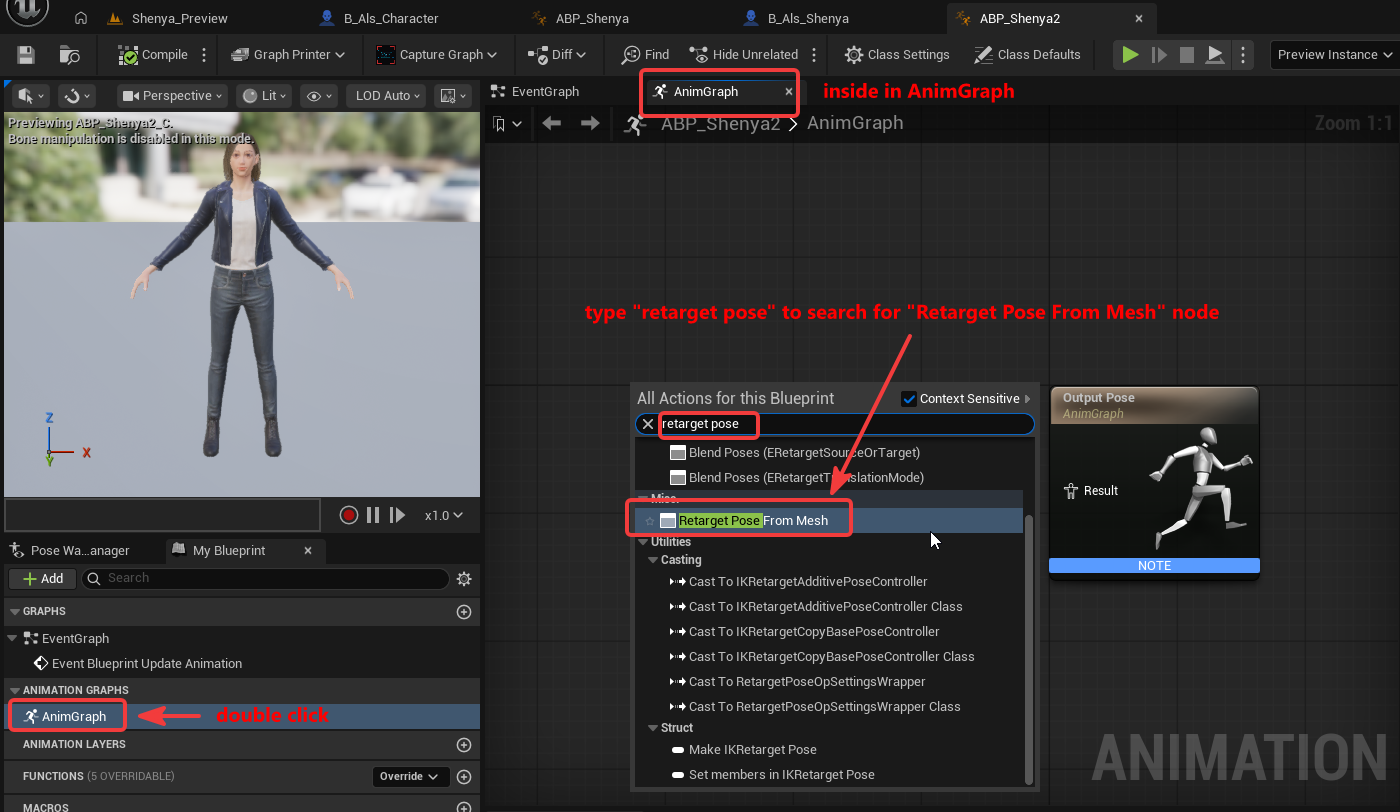
Select the node and assign your retargeter asset:
RTG_Als_to_Shenya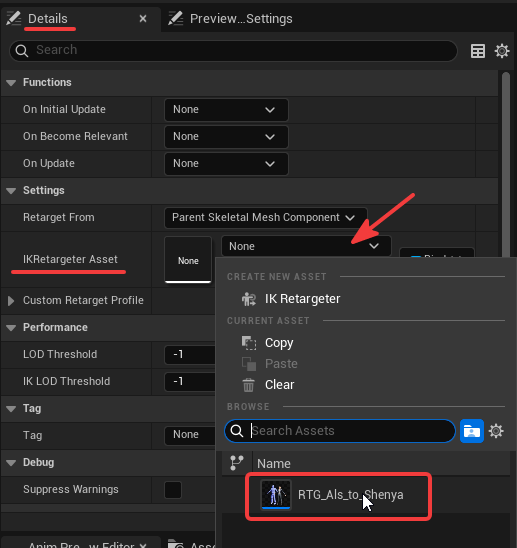
Then connect the node to the output pose.
What This Animation Blueprint Is Doing
Section titled “What This Animation Blueprint Is Doing”This small Animation Blueprint is not replacing ALS.
It is simply saying:
- read pose data from another mesh
- retarget that pose using
RTG_Als_to_Shenya - output the result onto this character mesh
That “other mesh” will be the original ALS mesh inside the same character Blueprint.
Apply the Retargeted Animation
Section titled “Apply the Retargeted Animation”1. Assign the New Animation Blueprint to Your Character Mesh
Section titled “1. Assign the New Animation Blueprint to Your Character Mesh”Go back to your duplicated character Blueprint, such as B_Als_Shenya.
Select your custom skeletal mesh component and set:
- Animation Mode ->
Use Animation Blueprint - Anim Class -> your new Animation Blueprint, for example
ABP_Shenya
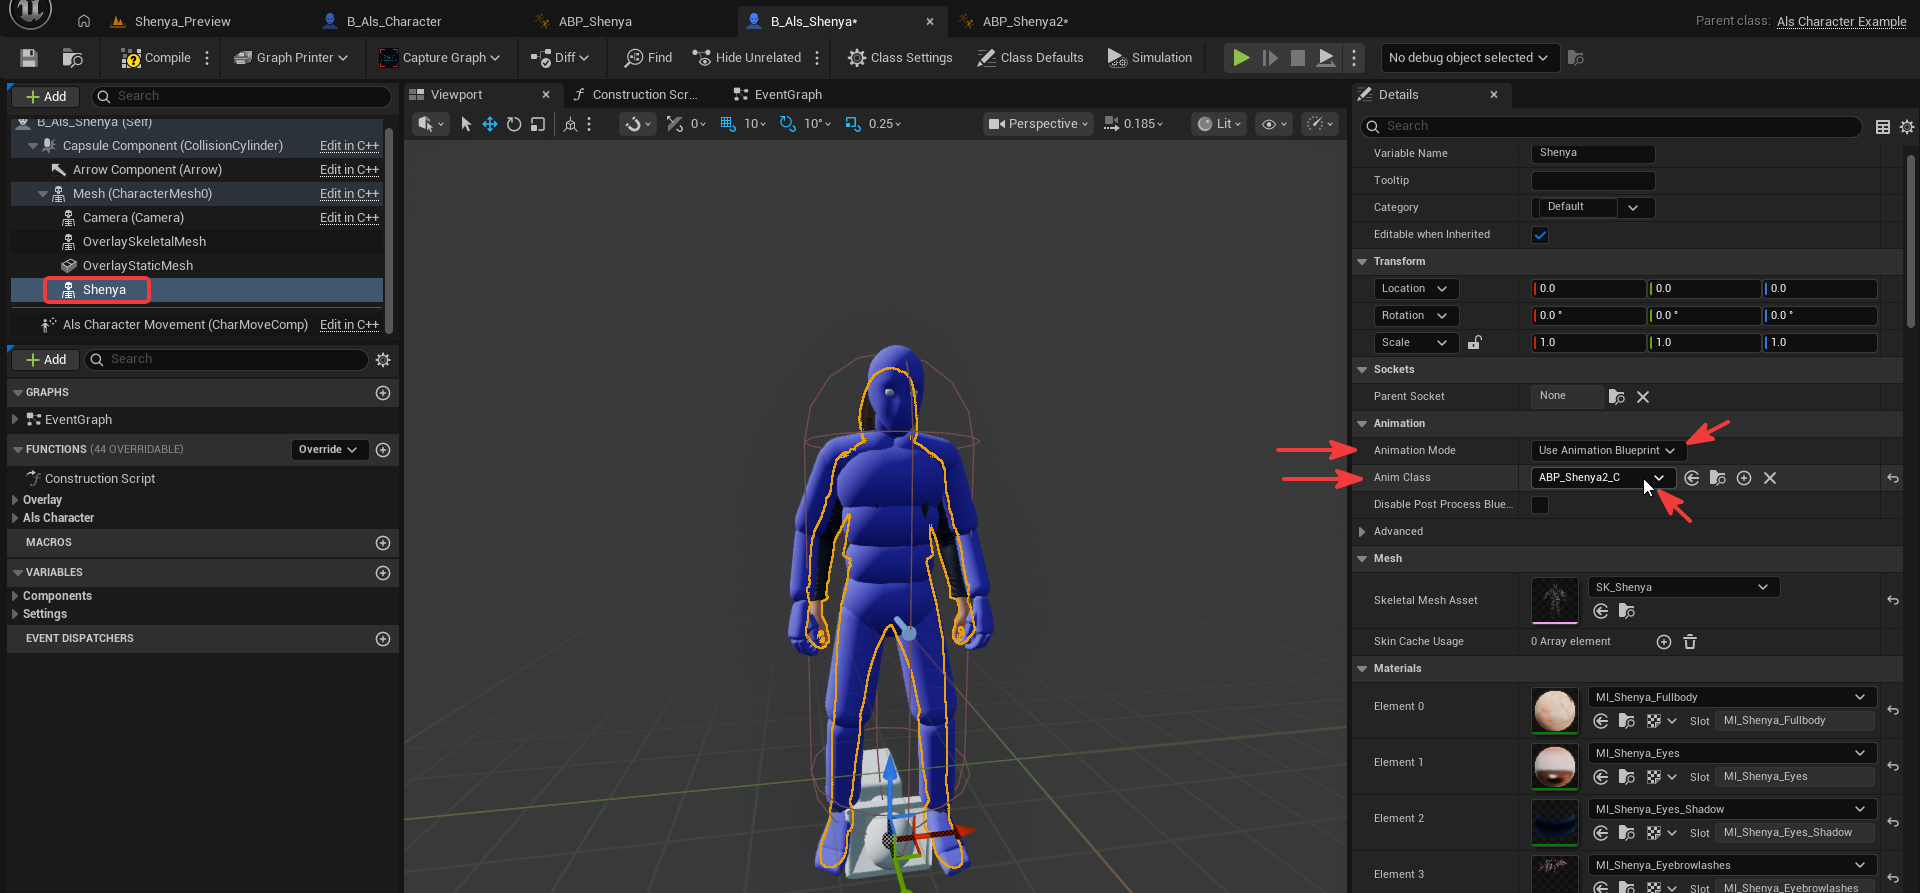
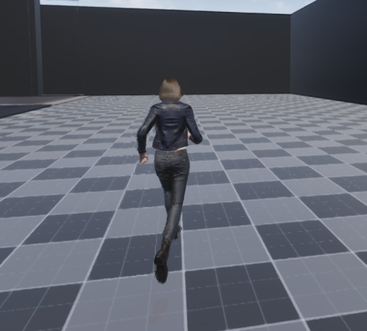
At this point, your visible character mesh should start following the ALS-driven motion.
2. Hide the Original ALS Mesh, But Keep It Animating
Section titled “2. Hide the Original ALS Mesh, But Keep It Animating”Now that your custom mesh is following ALS, you usually want to hide the original ALS body mesh.
Select the original ALS mesh component and:
- disable Visible
- set Visibility Based Anim Tick Option to
Always Tick Pose and Refresh Bones
Then compile the Blueprint.
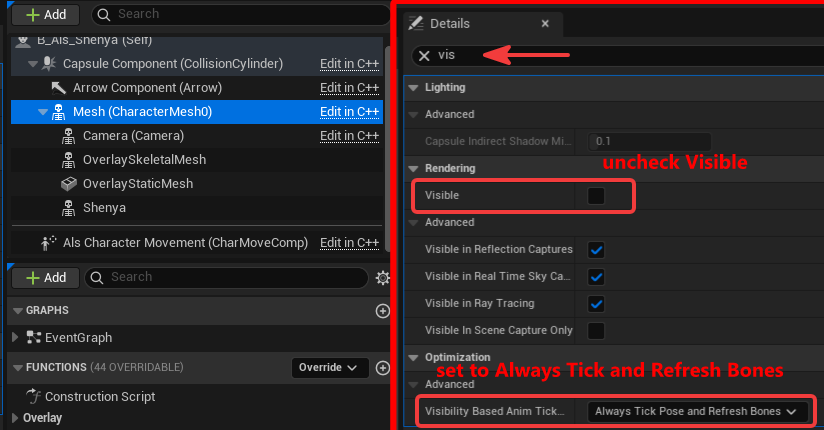
Why This Step Matters
Section titled “Why This Step Matters”Your custom mesh is copying pose data from the ALS mesh. If the ALS mesh stops updating because it is hidden, the retargeted mesh can stop following correctly or appear frozen.
So the correct setup is:
- hide the ALS mesh visually
- keep the ALS mesh updating its pose every frame
That is why Always Tick Pose and Refresh Bones is needed here.
Testing and Game Mode
Section titled “Testing and Game Mode”1. Quick Test by Dropping the Character into the Level
Section titled “1. Quick Test by Dropping the Character into the Level”You can do a quick sanity check by dragging your new character Blueprint into the level.
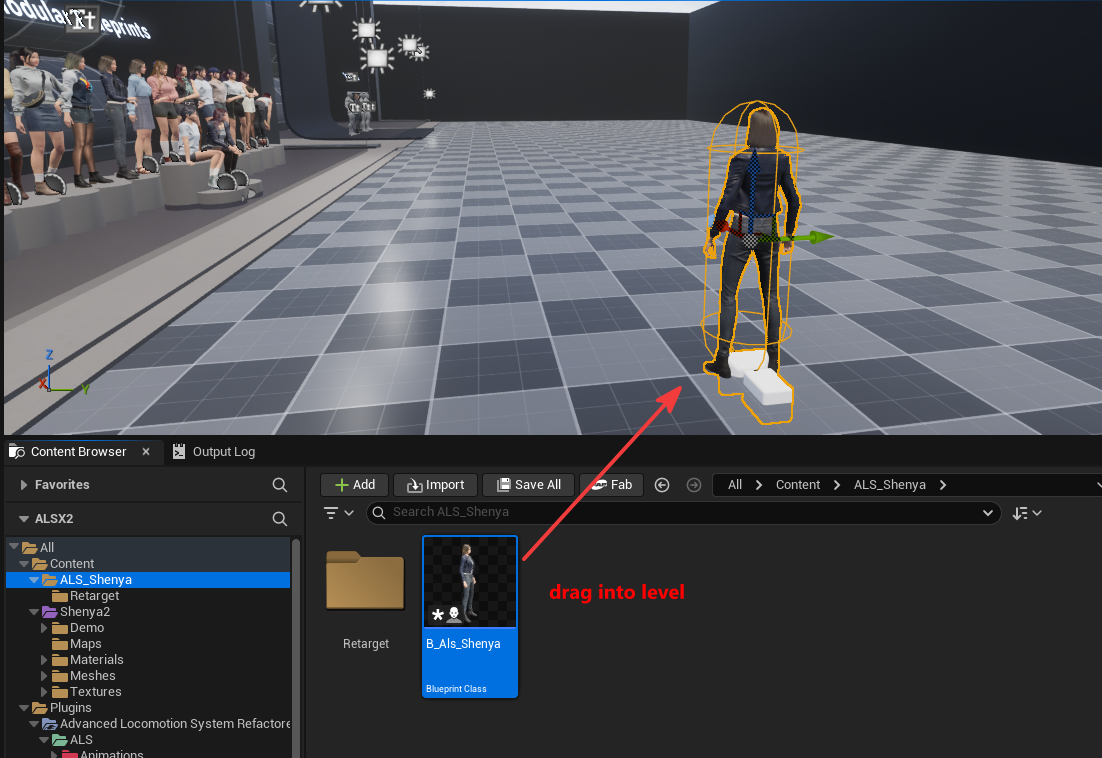
If you want a quick temporary test, select the actor in the level and set:
- Auto Possess Player ->
Player 0
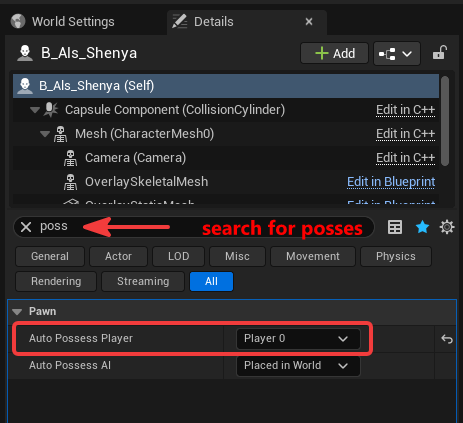
Then press Play.
This is useful for confirming:
- the Blueprint loads
- your custom mesh is visible
- retargeting is running
- the character can move
2. Properly Hook the Character into B_Als_GameMode
Section titled “2. Properly Hook the Character into B_Als_GameMode”The quick test above proves the character can move, but it does not fully recreate the sample ALS setup. In particular, the UI can be missing if the level is not using the ALS sample game mode.
To use the sample ALS controller and HUD behavior:
- open World Settings
- set GameMode Override to
B_Als_GameMode - set Default Pawn Class to your duplicated character Blueprint, for example
B_Als_Shenya
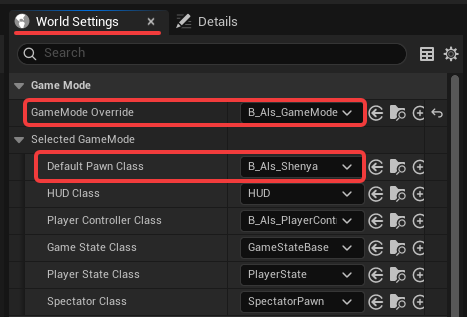
Now when you play again, you should get the sample UI as well.
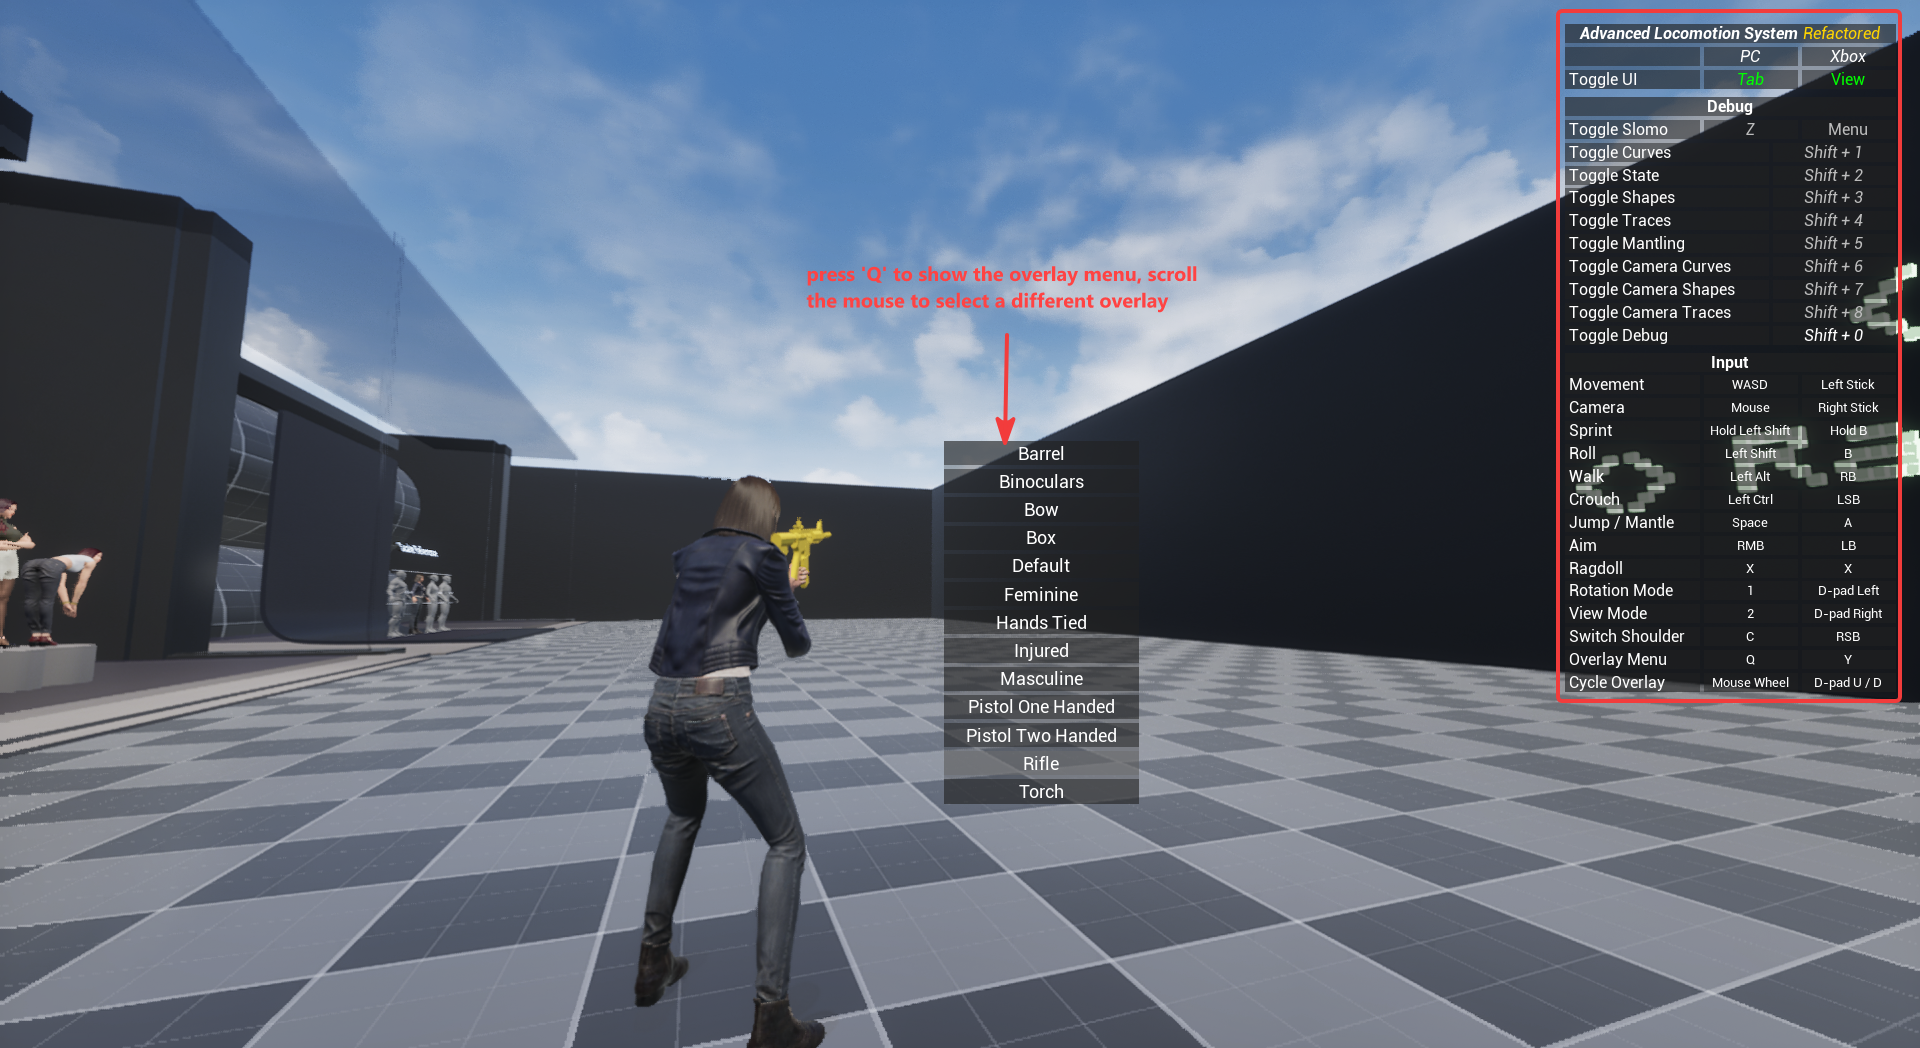
You can also test overlay mode:
- press
Qto open the overlay menu - use the mouse wheel to cycle overlays
Current Result
Section titled “Current Result”What Is Working, and What Is Not Yet
Section titled “What Is Working, and What Is Not Yet”The character is now fully driven by ALS — locomotion, camera, and overlays are all functional.
Several issues remain, the next section will covers how to fix the position of weapon (held-object, or overlay object).