Basic Renaming
Batch Rename
Section titled “Batch Rename”When you activate the tool, a dialog box will appear with a text field initially populated with the name of the first item in your selection.
If you pressed Enter, the selected objects will be renamed to
Numbering
Section titled “Numbering”If there are no numbers in the text input, RIn.Rename will automatically append numbers to the names, ensuring each object in Blender’s scene remains unique.
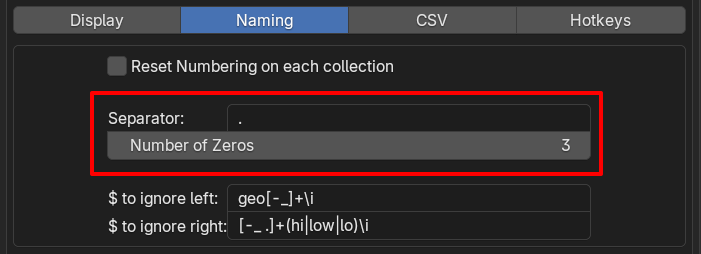
The default numbering format is .001, which is zero-padded to three digits. Numbering starts at 1, with . as the separator.
You can configure the default numbering format (the separator character and the number of digits) in the Addon Preferences.
Default numbering is applied when renamed results for multiple objects aren’t unique:
Example 1: (no numbering in the text input):
You can override the numbering format by adding numbers in your text input:
Example 2:
Example 3:
You can start at a specific number:
Alphabet Numbering token: @
Section titled “Alphabet Numbering token: @”You can use @ to number with alphabets (A-Z).
When a pattern mixes @ with a typed number, an Increment Typed Numbers checkbox appears under the text field. Turn it off when @ already makes the names unique:
Which numbers count up?
Section titled “Which numbers count up?”Change Numbering Format: <...>
Section titled “Change Numbering Format: <...>”Type a format inside angle brackets, as the whole input, to change the numbers that are already in the names. Any part you leave out keeps its current format.
- digits: the zero-padding, eg.
<4>turns001into0001. - separator: any other characters, placed in front of the number, eg.
<_>turnsCube.001intoCube_001. Usenfor no separator. - brackets:
(),[],<>or{}wrap the number, eg.<[]>turnsCube.001intoCube.[001]. Usebto remove brackets. - target:
lformats only the last number,fonly the first,aall numbers. Without a target, only the last number is formatted (Preferences > Naming > Change Numbering Format: Format Last Number by Default).
Examples:
<4>:Cube.001→Cube.0001<_3>:Cube.1→Cube_001<_3()>:Cube.1→Cube_(001)<_2l[]>:Cube.001→Cube_[01]<n2>:Cube.001→Cube01<b>:Cube_(001)→Cube_001<4a>:a01_b02→a0001_b0002<3f>:Shot_10_take_5→Shot_010_take_5
n, b, l, f and a are options, they can’t be used as separator characters.
Follows Selection Order
Section titled “Follows Selection Order”When you select or deselect objects in the viewport, this tool keeps track of the selection order. This ensures that when you apply numbering, the numbers follow the exact order in which the objects were selected.
Objects that are hidden in the viewport can still be renamed by selecting them in the Outliner.
If the order ever looks wrong, type /r and press Enter to reset the selection order to the Outliner’s order.
Select bones in Pose Mode or Edit Mode and rename them like objects. RIn.Rename knows which side of the armature each bone is on: from its name (hand.L, hand_r, L_hand, LeftHand), or from its position when the name has no side (+X is left, like Blender’s Auto-Name Left/Right). Bones on the centre line have no side.
Bones selected together (box select, Select Child, Select Mirror) are numbered along each chain, from parent to child. Click them one by one to choose the order yourself.
Add Side
Section titled “Add Side”When the typed name has no side, each bone gets the side it’s on. Centre bones keep the name as typed.
The side keeps the style of the bone’s old name, eg. hand_l becomes arm01_l. Names without a side use Preferences > Naming > Default Side Style:
.L / .R(default):hand.L, used by Blender and Rigify_L / _R:hand_L_l / _r:hand_l, used by the Unreal Engine mannequin.l / .r:hand.l, used by Auto-Rig ProLeft / Rightprefix:LeftHand, used by Mixamo
The Add Side checkbox appears under the text field when it matters. Turn it off to keep the names exactly as typed; a note tells you how many bones have no side.
If you type a side that doesn’t match, eg. arm01.L with right bones selected, the names are kept as typed and a note warns you.
Symmetric Numbering
Section titled “Symmetric Numbering”With bones on both sides selected, a Numbering choice appears under the text field:
- Symmetric (default): each side is numbered on its own, and each right bone takes the number of its left mirror, whatever order they were selected in.
- Continuous: one count over all selected bones.
Mirror Bone Renames
Section titled “Mirror Bone Renames”Turn on Mirror Bone Renames (under the text field, or in Preferences > Naming) to rename only one side and let RIn.Rename rename the other side for you. Each renamed bone’s mirror gets the new name with its side flipped. A line under the text field lists the mirror names before you press Enter.
Mirror bones are found by name first (hand.L / hand.R, like Blender’s X-Axis Mirror), then by position: the one bone whose head and tail mirror this bone’s across X. So pairs with unrelated names, eg. Bone and Bone.001, are found too. Centre bones, names without a side and bones without a mirror are skipped.
Blender renames the vertex groups of meshes that use the armature, so both sides’ vertex groups follow. Both sides are renamed in one step, so a single undo reverts them.
* Preferences > Naming > Bone Mirror Tolerance (0.001 by default) is how close a bone must be to the centre line to count as a centre bone, and to a mirrored position to count as a mirror.Comma Rename
Section titled “Comma Rename”You can rename multiple objects at the same time using comma.
Note: Whitespaces surrounding text are trimmed / stripped. If there are fewer names than selected objects, the remaining objects keep their names.
If you type just a comma , and press Enter, the text field will automatically populate with the names of the selected objects.
- Press Enter, text field becomes:
Text Field:
From here, you can modify the names as needed. For example:
Per-Object Input Fields: ,,
Section titled “Per-Object Input Fields: ,,”Type ,, to show one text field per selected object, filled with its current name. Edit any of them and press Enter to rename, or click Go Back to return to the normal text field.
This works with up to 20 selected items. For more, use , instead.
Chain Commands: |
Section titled “Chain Commands: |”Separate commands with | to run them one after another. Each command works on the result of the previous one.
Most rename commands can be chained: names and tokens, prefix and suffix, search and replace, remove and insert text, number formats, text transformations and /s:{word}. Commands that open buttons or lists (eg. /, /f, /s, /m, ,, =) can’t be chained.
| are part of the command, eg. ;;|/lo| /- ends by replacing spaces with -.
Search and Replace
Section titled “Search and Replace”Use / to replace text.
The input must contain exactly one / .
Search is not case-sensitive by default, so cube/Box also replaces Cube and CUBE. You can change this in Preferences > Naming > Case Sensitive Search & Replace. Start the command with ! to do the opposite of that setting for one rename:
Remove text
Section titled “Remove text”Leave the part after / blank.
This will remove any occurrence of text_to_remove in the names.
Replace a word or number by position
Section titled “Replace a word or number by position”Use a word or number token on the search side to replace only that word or number:
~n, ~~n, #n and ##n work here, and negative numbers count from the end (eg. ~-1/ removes the last word). Names that don’t have that word or number stay unchanged.
Replace every separator: ^
Section titled “Replace every separator: ^”Use ^ as the search text to replace every non-alphanumeric character, eg. ^/_ turns GEO-Forearm R into GEO_Forearm_R. See Replace Non-Alphanumeric Characters.