Commands and Transformations
Commands
Section titled “Commands”Commands are short text instructions you type to tell RinRename what to do.
For now, most commands can’t be combined with tokens—while you can use it with >>, <<, comma rename and search and replace, the tokens won’t function as intended. Future updates will gradually bring this compatibility.
Prefix and Suffix: >>, <<
Section titled “Prefix and Suffix: >>, <<”Syntax: >> text_to_prefix
Syntax: text_to_suffix
Remove Characters: -n, —n
Section titled “Remove Characters: -n, —n”You can remove a certain number of characters from the start or end of a name using -n or —n , where n is a number.
- -n removes characters from the left of the name.
- Example: -1 removes the first character, -2 removes the first two, and so on.
- —n removes characters from the right of the name.
- Example: —1 removes the last character, —2 removes the last two, and so on.
Add Text: +{text}@{position}
Section titled “Add Text: +{text}@{position}”Insert text at a specific position in the name using the syntax: +text@position .
- Example:
+hello@3inserts"hello"after the 3rd character in the name.
Swap two names: /x
Section titled “Swap two names: /x”Select two objects and use ’ /x ’ to swap their names.
Replace Separators: <{sep}>
Section titled “Replace Separators: <{sep}>”Replace any character that is not a letter (A-Z) or numbers (0-9) with the text within the angle brackets.
Under the hood, the code uses the regex pattern [^A-Za-z0-9]+ to find any characters that are not letters or numbers.
Example 1:
Example 2:
Example 3: *There’s a space between the angle brackets
Example 4: *Any text can be used, not just . , _ - or space
Replace Non-Alphanumeric Characters: ^/{replacement}
Section titled “Replace Non-Alphanumeric Characters: ^/{replacement}”Use ^ on the search side of Search and Replace to replace non-alphanumeric characters.
This is useful when you want to normalize separators without replacing important text.
By default, ^ keeps dots, so Blender suffixes such as .001 and side markers such as .R are preserved.
This behavior is controlled in Preferences:
- Collapse non-alphanumeric runs for ^ replaces consecutive matching characters as one run.
- Characters ignored by ^ lists characters that should be kept instead of replaced.
Example with collapse enabled:
Copy name from Active Object: =
Section titled “Copy name from Active Object: =”The active object in Blender is the last item selected in Object Mode. It’s outlined in yellow.
Select multiple objects, making sure to select the source or active object last. Type = (and then press Enter/Ok) to copy from the source name.
Example: Numbering will be added to Target names while Source’s name is not changed.
Name Mirroring: ==
Section titled “Name Mirroring: ==”Use ’ == ’ to copy names from first half of the selection to the second half.
Selections is divided by 2 to get the first half and second half, names are then copied from first half to second half
Group Comma: (…, …)
Section titled “Group Comma: (…, …)”The group comma command allows you to assign different names to objects based on their collections using a specific syntax:
prefix_text_ ( text_one , text_two , … ) _suffix_textThe parentheses and commas inside them are required.
This command is particularly useful when renaming objects that exist in multiple collections. The grouped names inside the parentheses will be applied to objects within each collection in order.
For example, if you use (text_one, text_two, text_three), the first collection’s objects will be named text_one, text_two, text_three, and the same pattern will repeat for objects in the second collection, then the third, and so on.
This is especially handy for naming objects across collections with similar structures. For instance, if you have Highpoly, Lowpoly, and Cage collections, you can use this command to ensure objects in each collection share consistent naming while keeping their group distinctions.
Syntax: ( name1, name2, … )
How it works:
Section titled “How it works:”- Enter a name group in parentheses, like
(aaa, bbb). - Rinrename applies the names in order to objects in each collection.
- If the collection has more objects than the group, it repeats the sequence until all objects are named.
Selections
Collection A: Object1, Object2, Object3Collection B: Object4, Object5Collection C: Object7, Object8, Object9, Object10Simplified Output
Collection A: aaa, bbb, aaaCollection B: aaa, bbbCollection C: aaa, bbb, aaa, bbbNote: in actual Blender scene, since names has to be unique, it will turn into the following
Actual Output
Collection A: aaa.001, bbb.001, aaa.002Collection B: aaa.003, bbb.002Collection C: aaa.004, bbb.003, aaa.005, bbb.004which might be confusing, so you might want to pair it with the collection token ;; :
Actual Output
Collection A: [Collection A] aaa.001, [Collection A] bbb, [Collection A] aaa.002Collection B: [Collection B] aaa, [Collection B] bbbCollection C: [Collection C] aaa.001, [Collection C] bbb.001, [Collection C] aaa.002, [Collection C] bbb.002This command is useful for the following situation:
Selections
HI: Object1, Object2, Object3LO: Object4, Object5, Object6CAGE: Object7, Object8, Object9Output
HI: cube_HI, sphere_HI, pyramid_HILO: cube_LO, sphere_LO, pyramid_LOCAGE: cube_CAGE, sphere_CAGE, pyramid_CAGE>> (…, …)
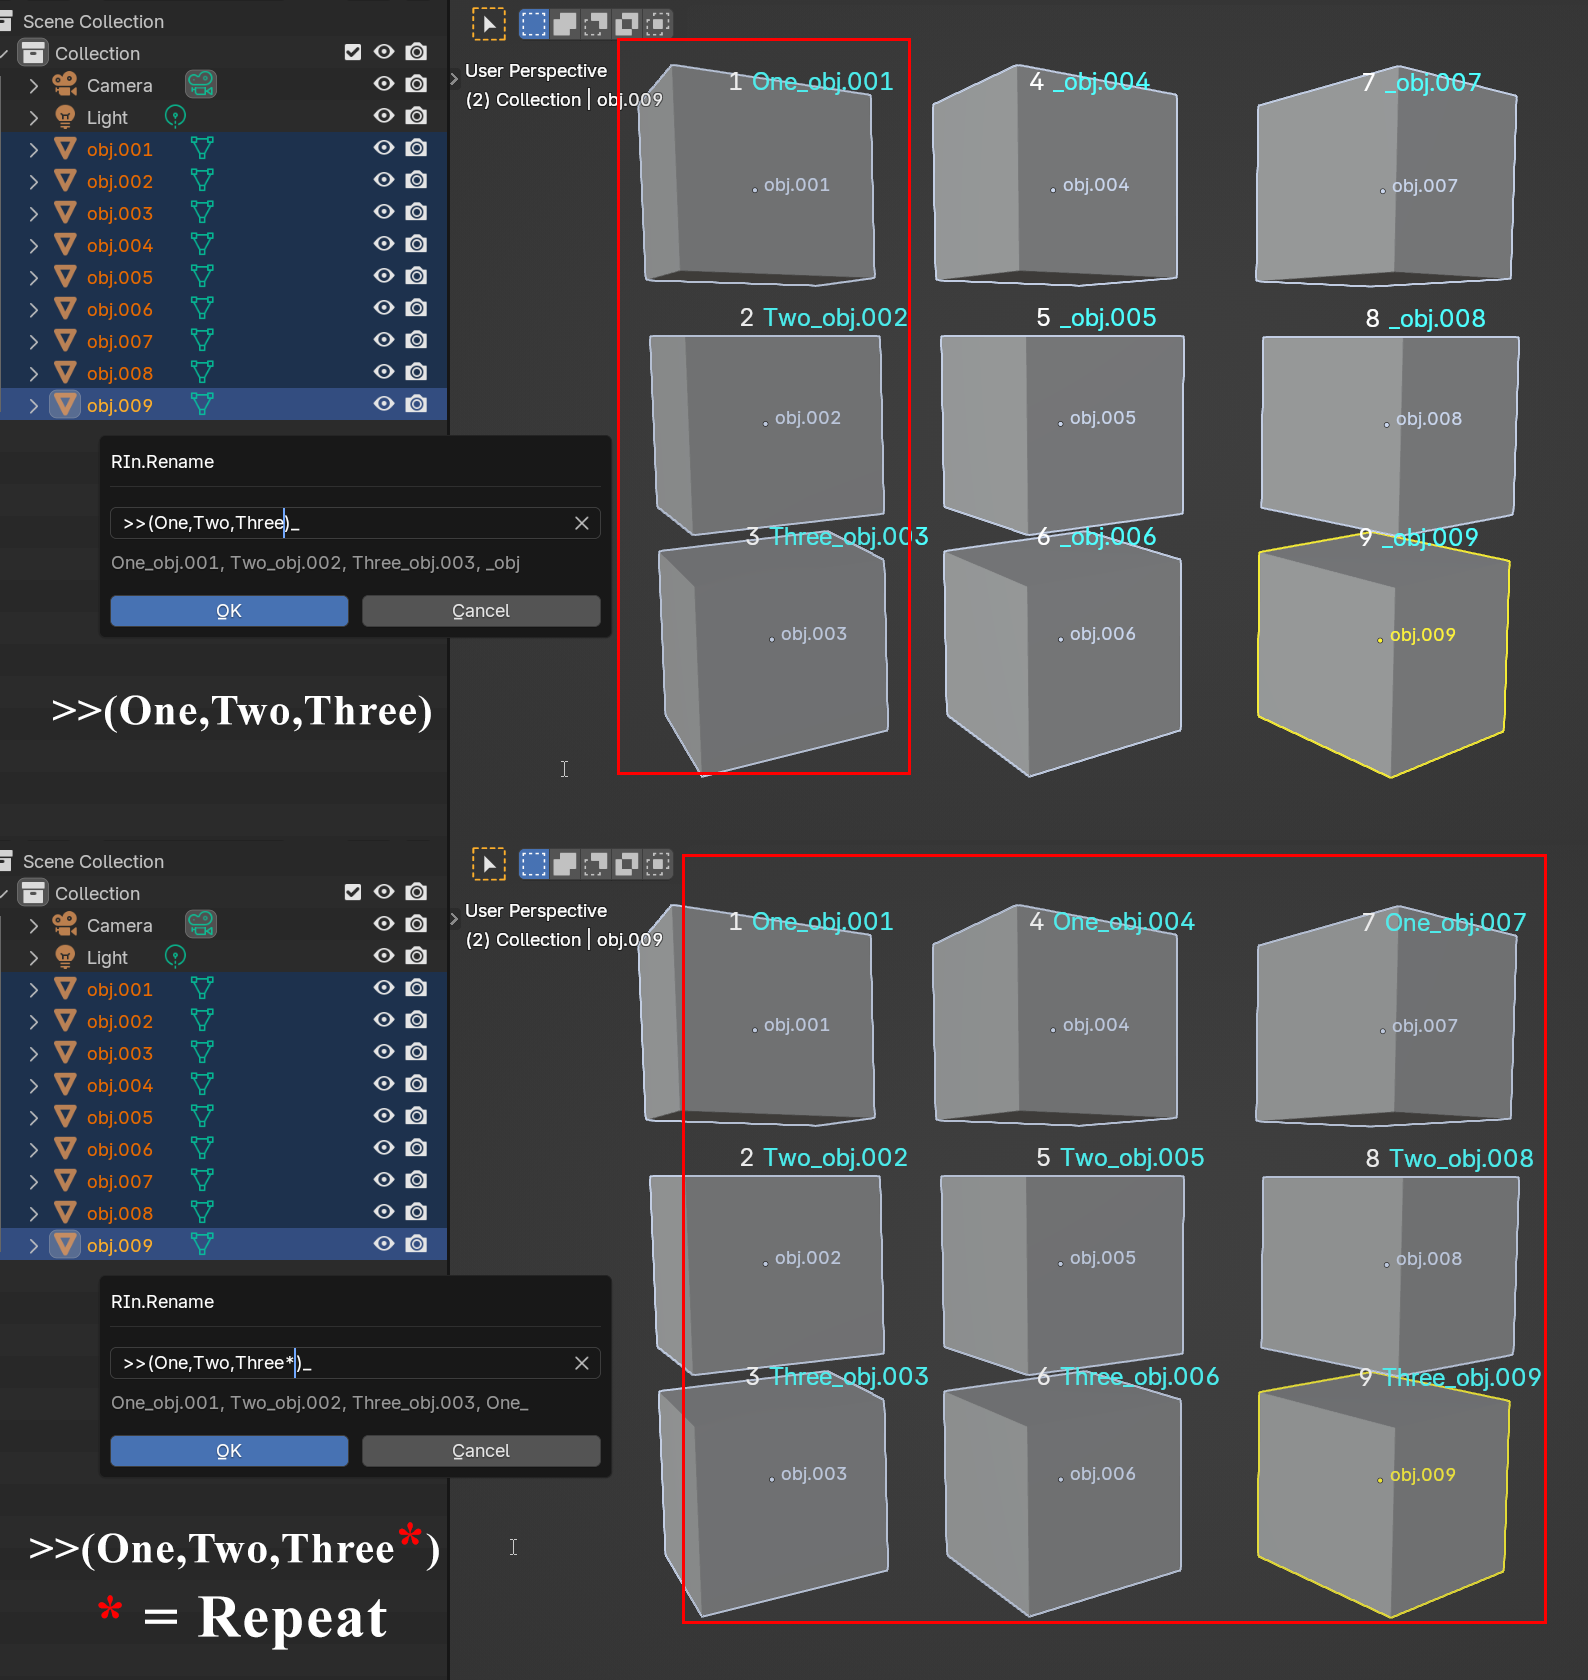
Section titled “>> (…, …)”You can use the prefix and suffix command with group comma:
If you add an asterisk at the last item before the closing bracket, the items in the group will repeat for all the objects:
Object name to Data name: /d
Section titled “Object name to Data name: /d”Use /d to copy an object’s name to its data name.
You can also type / or /? to open the help view. When the current selection has objects with writable data names, RIn.Rename shows the same Object Name to Data Name action as a contextual button.
Note: Blender doesn’t keep object and data names in sync when using the standard F2 rename or the Batch Rename tool (Ctrl + F2).
RIn.Rename have the option to automatically rename mesh data names.
Viewport Names: /vn and /hvn
Section titled “Viewport Names: /vn and /hvn”Use /vn to show viewport names for the selected objects, or /hvn to hide them.
These actions also appear in the / help view when the current selection contains objects.
Favourites: /f
Section titled “Favourites: /f”Use /f to show favourite command buttons in the rename dialog.
Favourite commands are configured in Preferences. If a favourite has a comment, RIn.Rename uses the comment as the button label. Otherwise, it shows the command text.
Clicking a favourite fills the current rename input with that command, so you can preview it before confirming.
Rename Object Subdata Lists
Section titled “Rename Object Subdata Lists”These commands open editable rename lists for data that belongs to the selected object or objects.
| Command | Renames |
|---|---|
| /m | Materials |
| /mo , /mod | Modifiers |
| /vg | Vertex groups |
| /sk | Shape keys |
| /uv | UV maps |
| /at , /attr | Mesh attributes |
| /ca | Color attributes |
Use these commands by themselves to open the list workflow.
For shape keys, /sk opens the editable list. The older /sk:command workflow still applies a command directly to shape keys.
Note: List rename workflows require Dialog mode. If single-selection mode is set to Popup, RIn.Rename shows a “requires Dialog mode” message instead.
Text Transformations
Section titled “Text Transformations”/strip
Section titled “/strip”The /strip command removes extra whitespace from both the beginning and end of an object’s name.
- /lstrip ( short form: /ls ) – Removes whitespace from the left side.
- /rstrip ( short form: /rs ) – Removes whitespace from the right side.
/stripSep
Section titled “/stripSep”The /stripSep command (where sep stands for separator) goes beyond just trimming whitespace—it removes any non-alphanumeric characters (anything not in A–Z, a–z, or 0–9). This includes common separators like -, _, ., and spaces. (In code, it targets [^A-Za-z0-9])
Short forms:
- /ss – Strip from both sides
- /lss – Strip from the left side
- /rss – Strip from the right side
💡 Note: While the name
/stripSepsuggests it only targets separators, it’s broader and removes any non-alphanumeric characters.
Camel Case: /camel
Section titled “Camel Case: /camel”The /camel command converts the core of the name (based on the $ token) into camel case.
How it works:
- It extracts the core name using the
$token. - It joins words if the last character of one word and the first character of the next are letters (e.g.,
"Character_Armature"→"CharacterArmature"). - Words separated by non-letter characters (like
"Cube.01"or"v2_4k") won’t be joined.
Selections
01. Cube.01-Main.00101_Character_Armature_Final.001Light Rig_v2_4KOutput
01. Cube.01-Main.001 (No Change)01_CharacterArmatureFinal.001LightRigV2_4KSplit Camel Case: /sc, /sc:{sep}
Section titled “Split Camel Case: /sc, /sc:{sep}”The /sc command splits camel case text using a separator.
You can specify the separator like this:
- /sc:sep
- /scsep
If no separator is provided, it defaults to the one set in the preferences (Preferences > Naming > Separator).
Text Transformations with Tokens
Section titled “Text Transformations with Tokens”These text transformation commands support tokens: /up , /lo , /title
Example:
/up ~2 will transform second word of the object’s name into uppercase.
/up ~1~2 will transform the first and second word of the object’s name into uppercase.